Forking is one of the main collaborative tools available that make GitHub such a powerful platform for open source development. Forks allow developers across all of GitHub to iterate on ideas and changes before they are proposed back to the parent repository. Branches allow you to develop features, fix bugs, or safely experiment with new ideas in a contained area of your repository. They can be particularly useful when collaborating within a team, allowing for independent development of different areas of the repository that do not interfere with each other. This skills session will use directed, interactive lessons to provide NOAA Fisheries staff with a foundation in using forks for open source development in GitHub.
What is a Fork?
What is a Branch?
Tutorial: Forking a repository
For this tutorial, we’re going to be forking a demo repository (https://github.com/nmfs-opensci/GitHub-Clinic-demos), editing our forked copies, and creating a pull request to contribute back to the main repository. Follow along on your own account.
Step 1: Fork the repository
- Open the demo repository in GitHub.
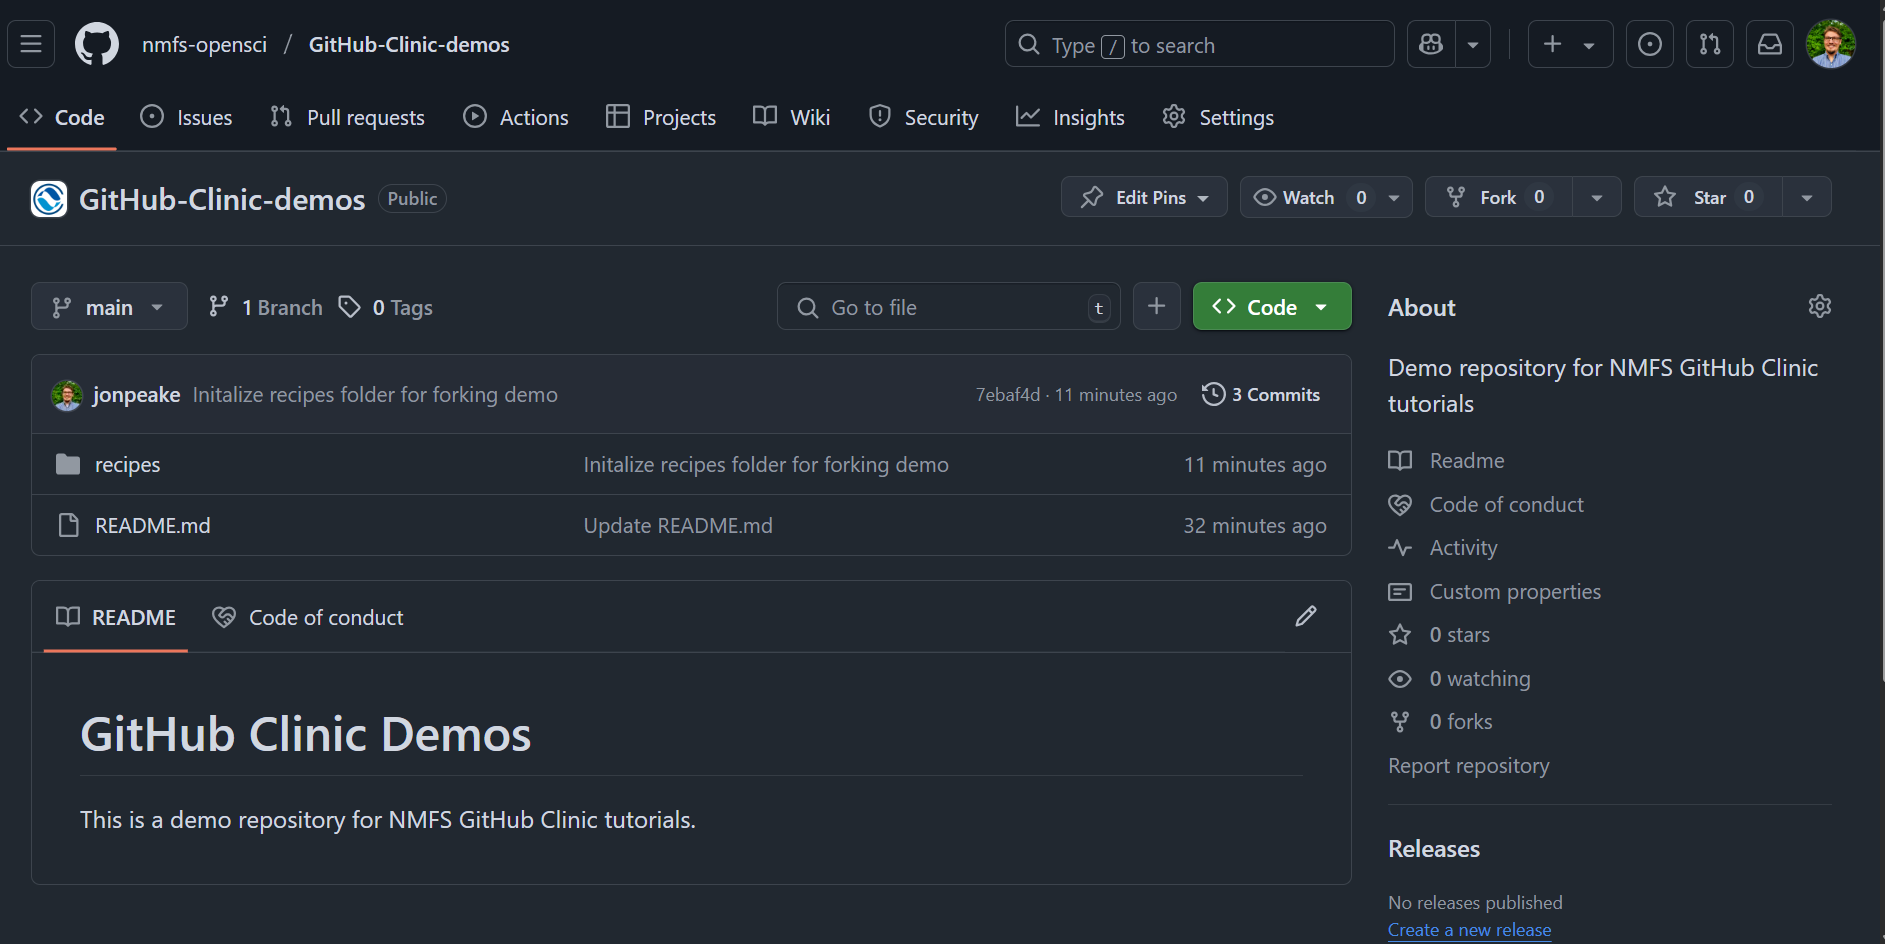
- At the top of the repository, click the Fork button

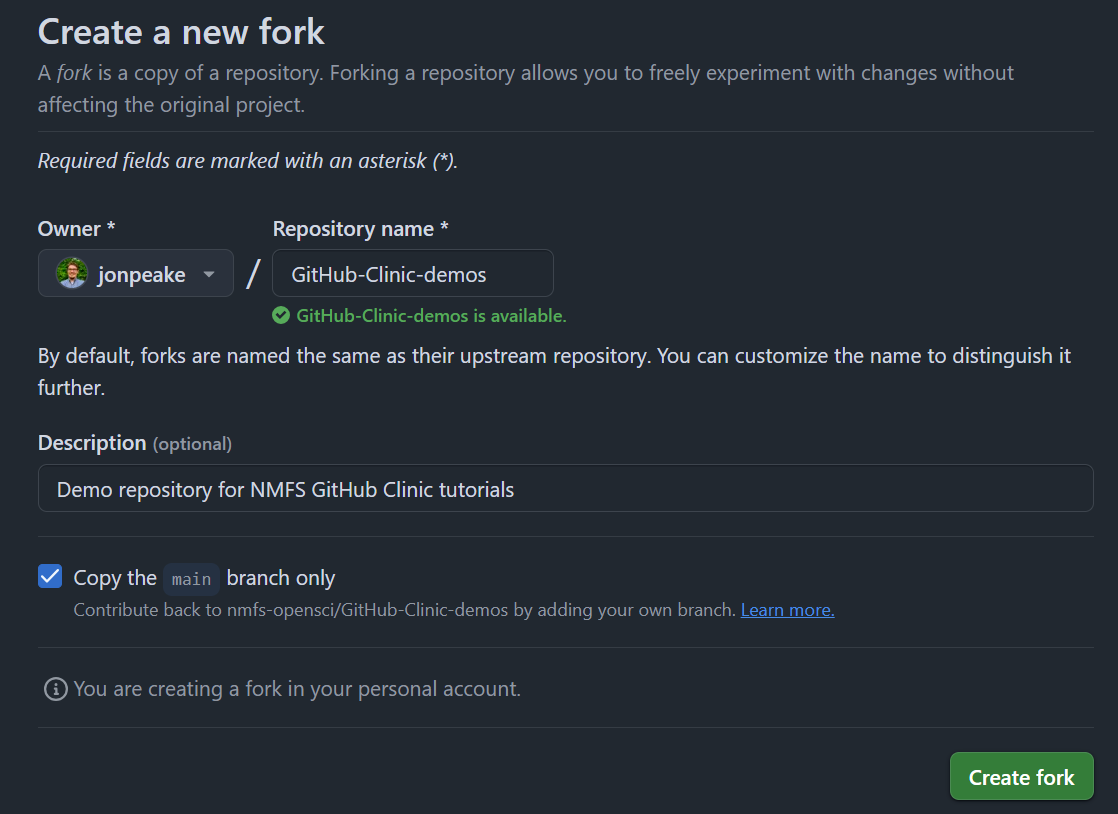
- Keep everything default (your account should be listed under Owner, and the Repository name should be pre-filled for you). Click the green Create Fork button.
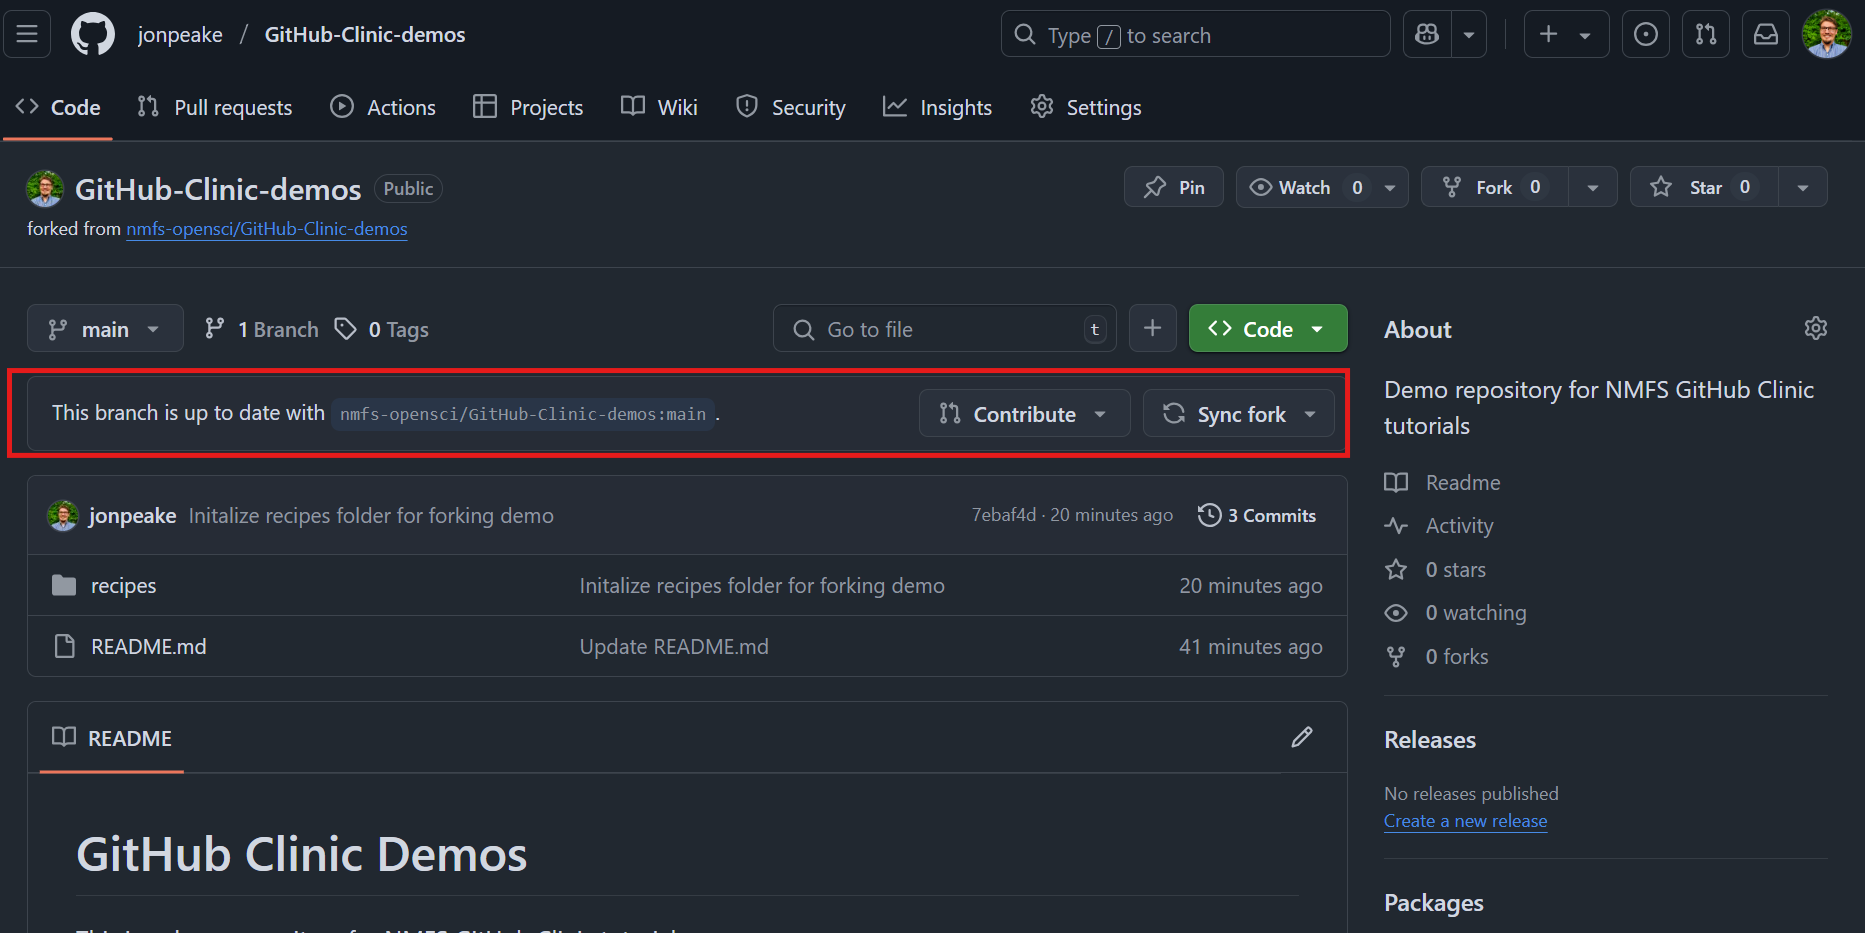
- You now have a copy of the original repository in your account. Note that the fork is still connected to the parent repository, so when a change is made to the parent, you can sync it to your fork
Step 2: Add content to your forked repository
We’re going to add a recipe to our forked repository. You can add whatever recipe you’d like, with as many details as you’d like; for this demonstration, we’ll keep it simple (we’ve provided a more detailed chocolate chip recipe as an example to start out).
- Click on the
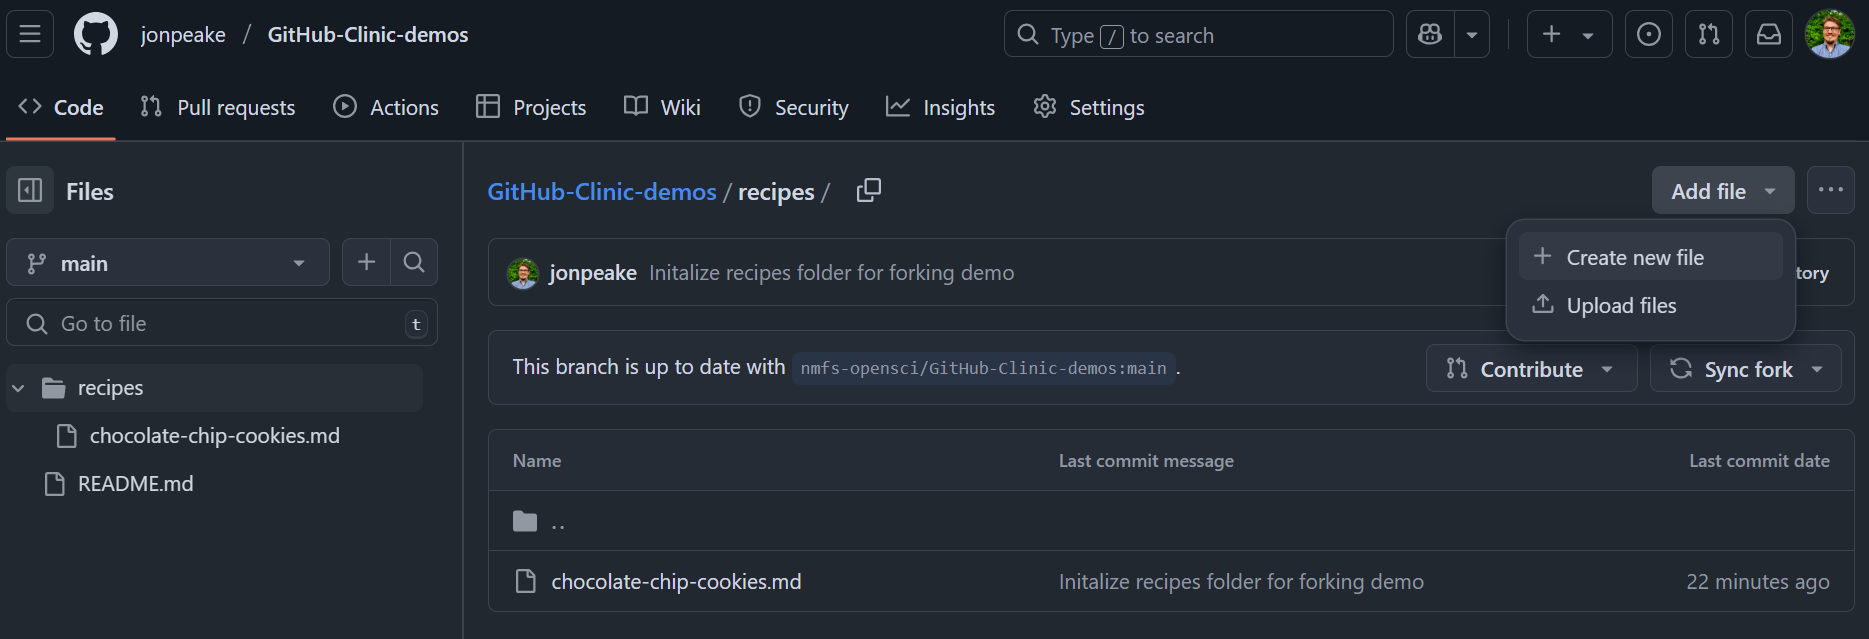
recipesfolder in the file tree of your forked repository, click the Add file dropdown, and click “Create new file”
- Name your recipe file, and make sure it ends in
.md. We’re making a markdown file here, so we need the.mdfile extension.

- Enter your recipe into the file contents. Remember that we can use markdown formatting here; let’s take advantage of that by adding a title and a couple headings for
## Ingredientsand## Instructions.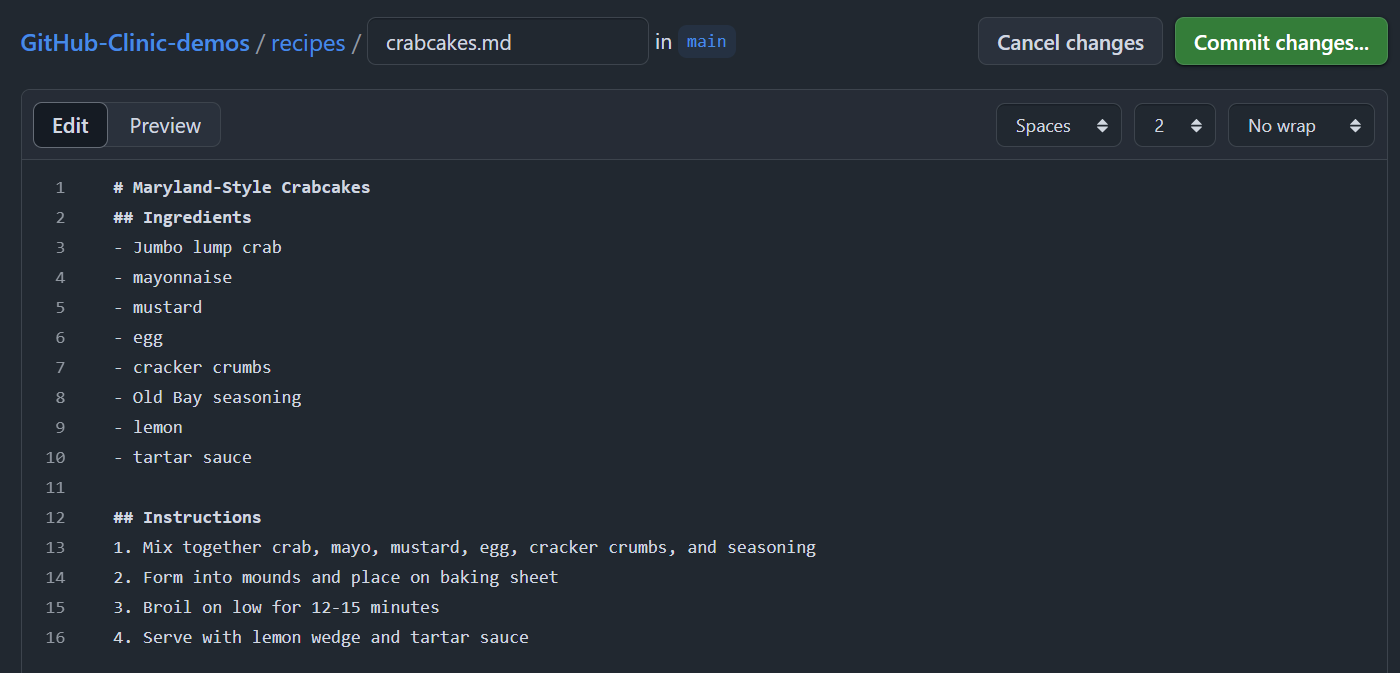
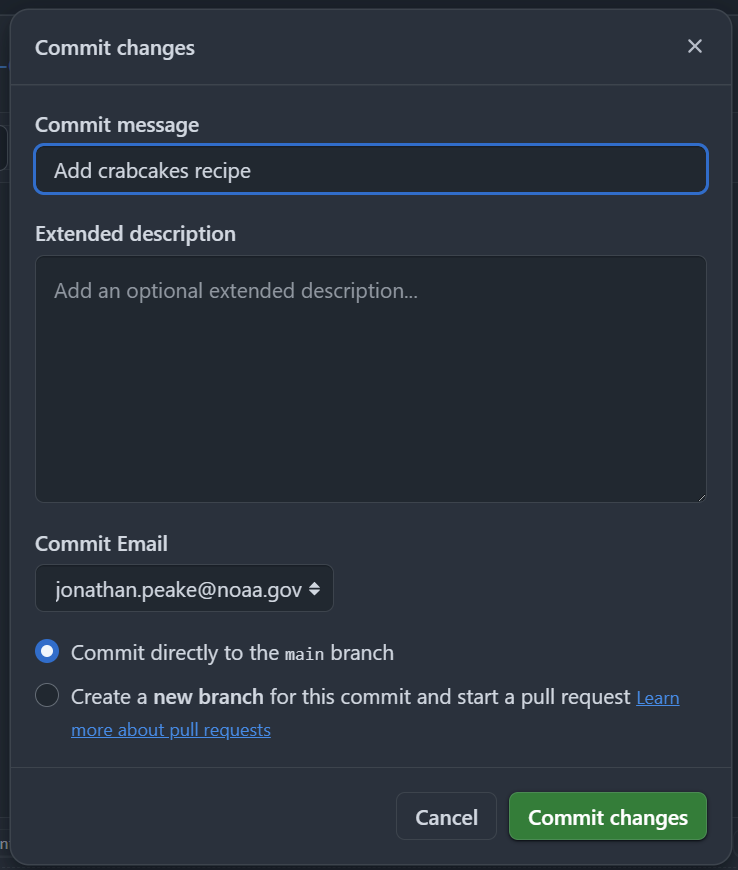
- Commit your changes to the main branch of your repository.
Step 3: Contribute your recipe to the parent repository
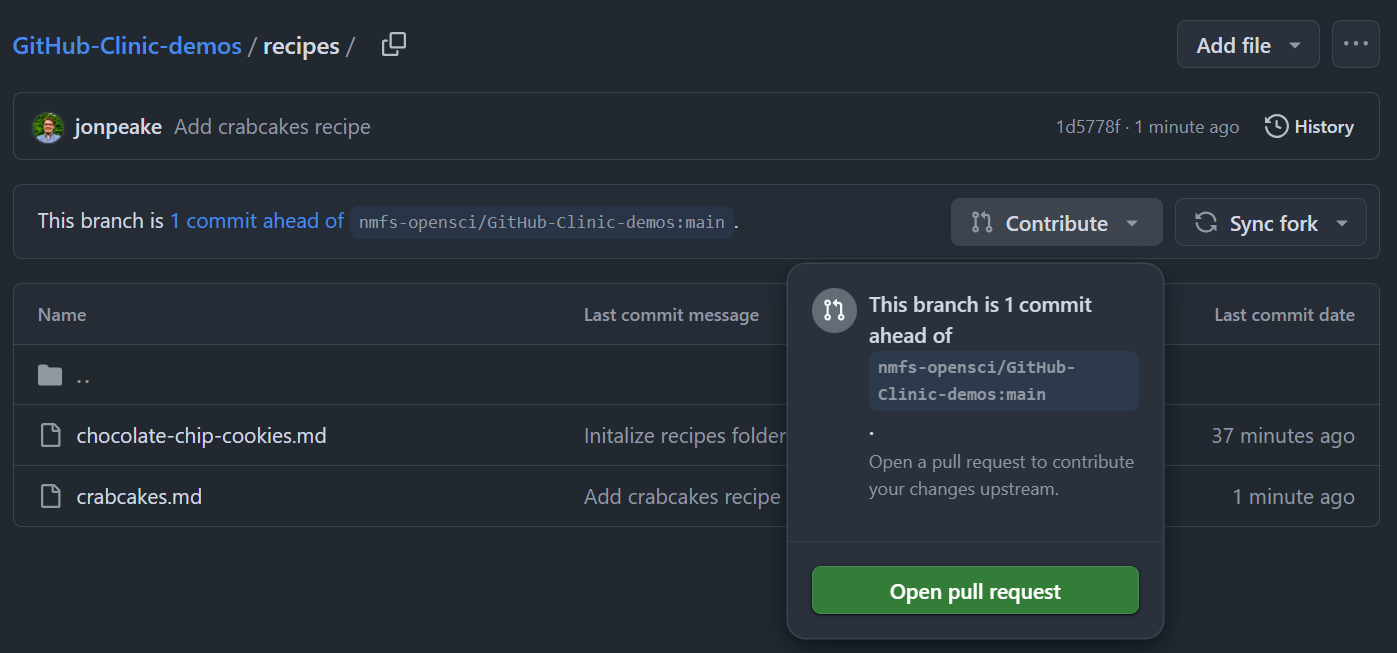
- Open the Contribute drop-down on the repository, and click the green Open pull request button to contribute this recipe back to the parent repository.
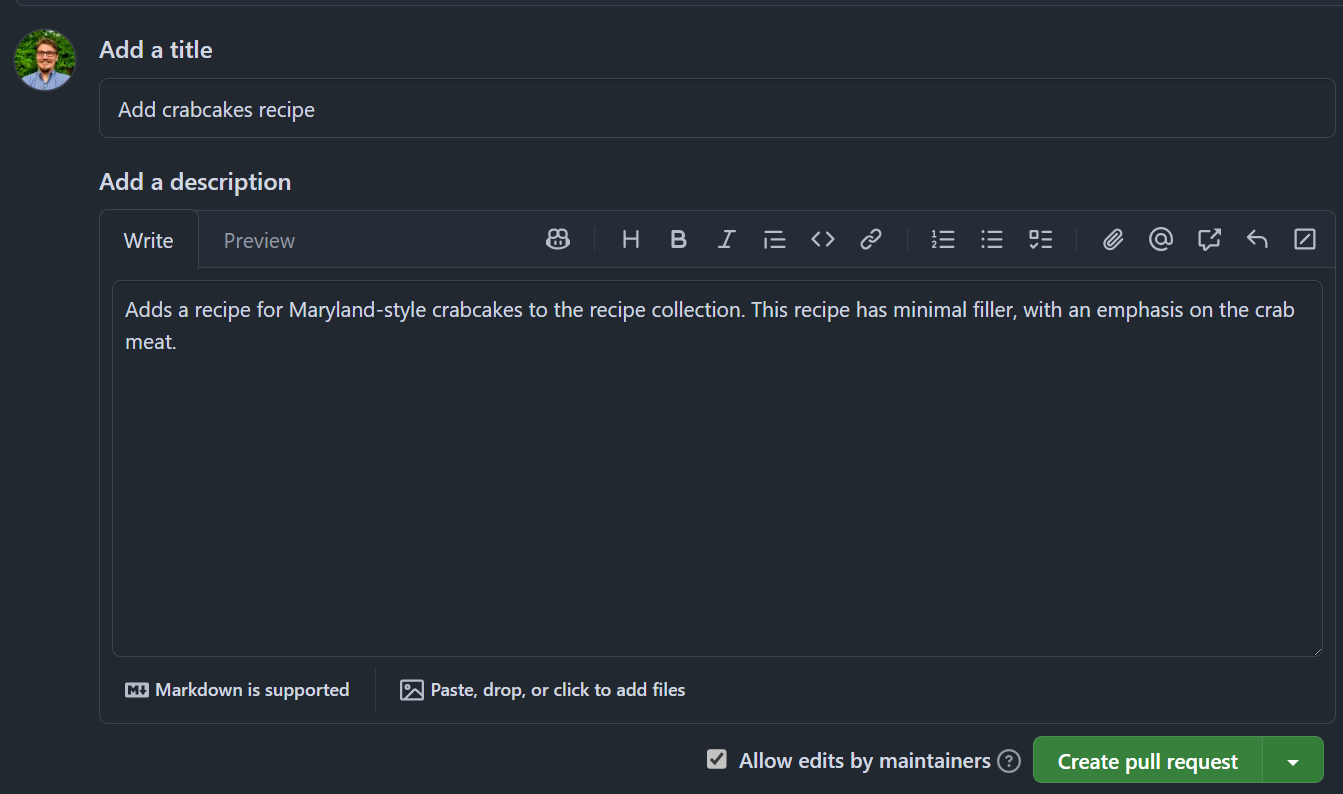
- Your Pull Request (PR) will auto-populate the title with your commit message. You can edit this if you want, or add an extended description. Generally the more descriptive the better, especially if you’re fixing a bug or adding a feature to another repository. For now, we can be brief. Add a description, and click **Create pull request**
- Once you create the PR, you’ll be brought to the PR on the parent repository. Note that if you do not have write permission on the parent repository, you will not have the option to merge the pull request. But if you do, you can review the pull request and merge it in if everything looks good!
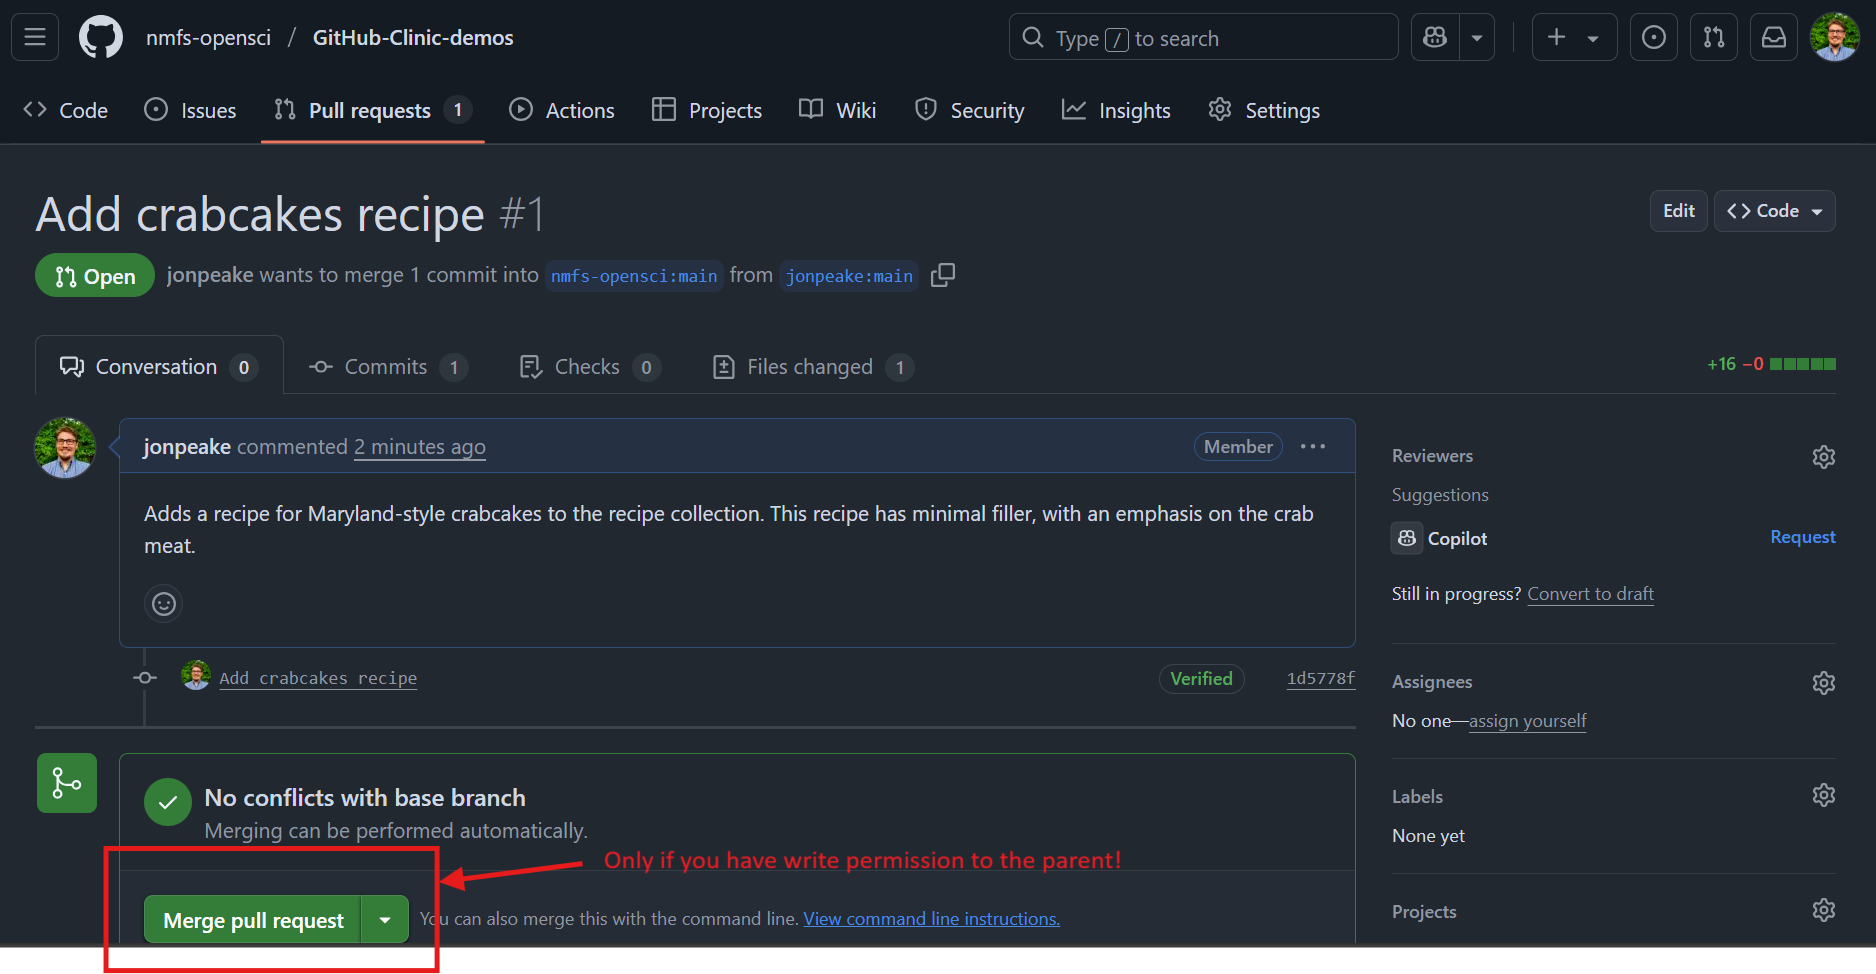
Step 4: Sync changes from parent to your fork
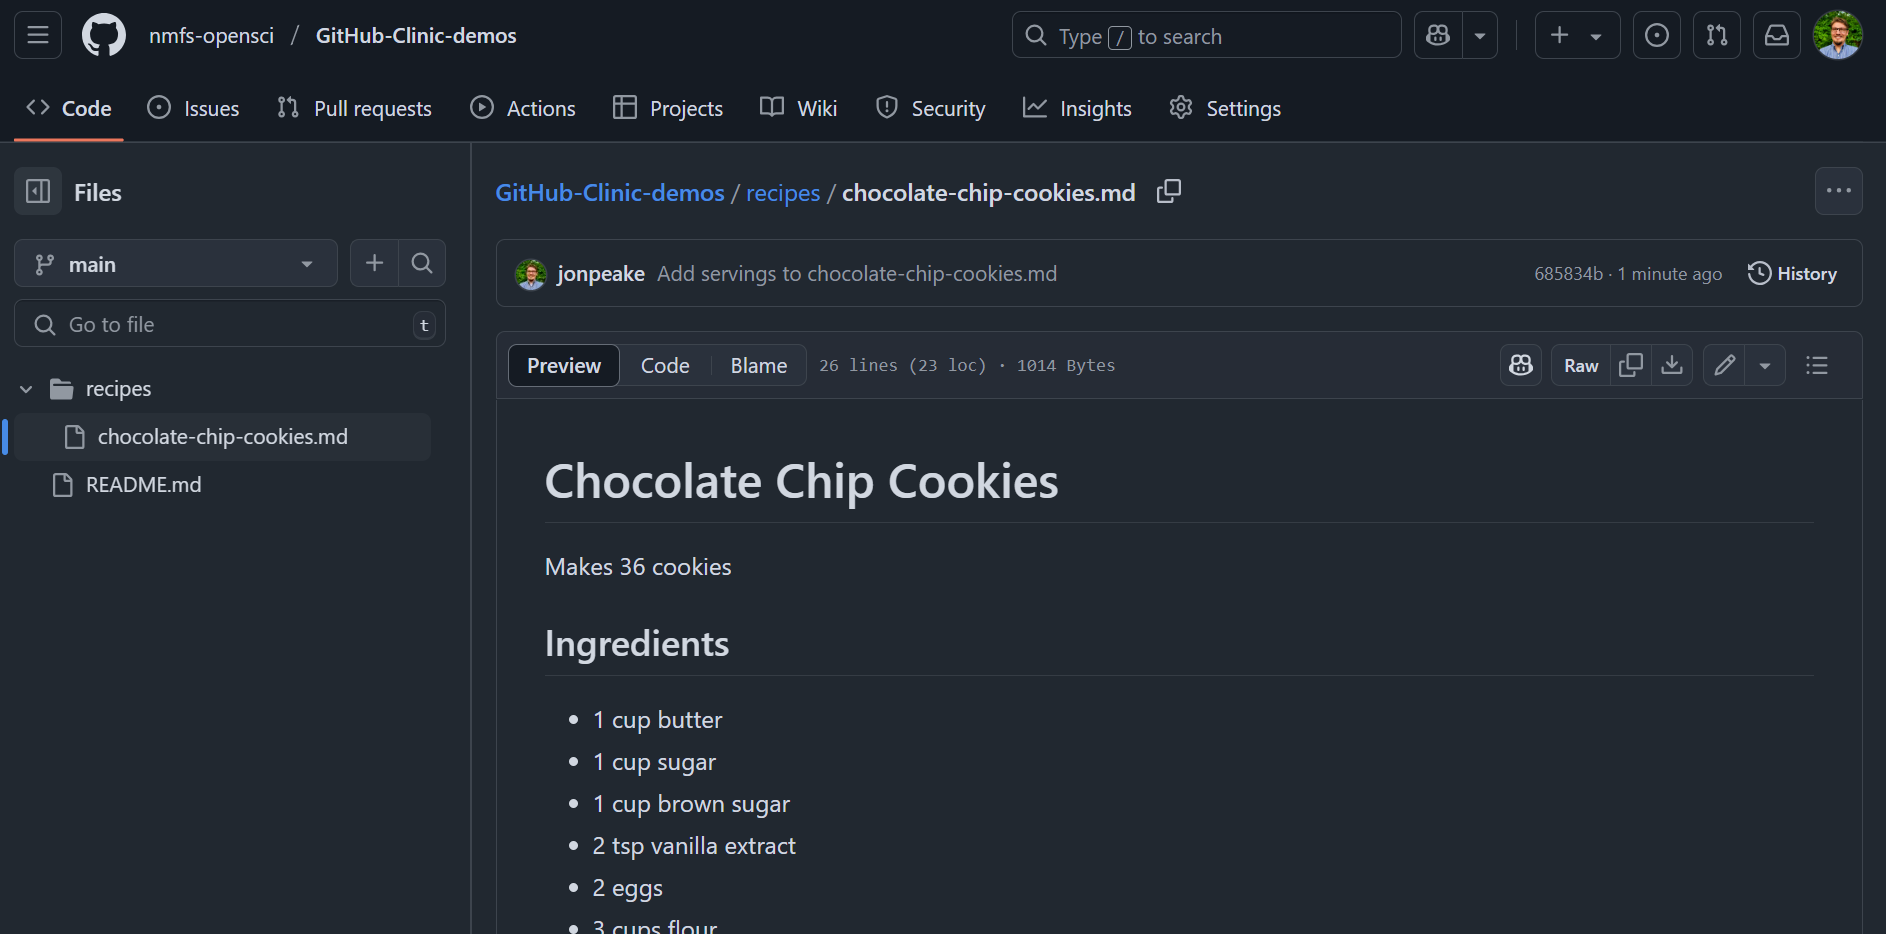
If a change was made to the parent repository, you can sync that change to your forked repository. For this demo, I added the number of cookies that are made to the chocolate chip cookie recipe (on the main nfms-opensci repository). Let’s see how we can integrate that change to our fork.
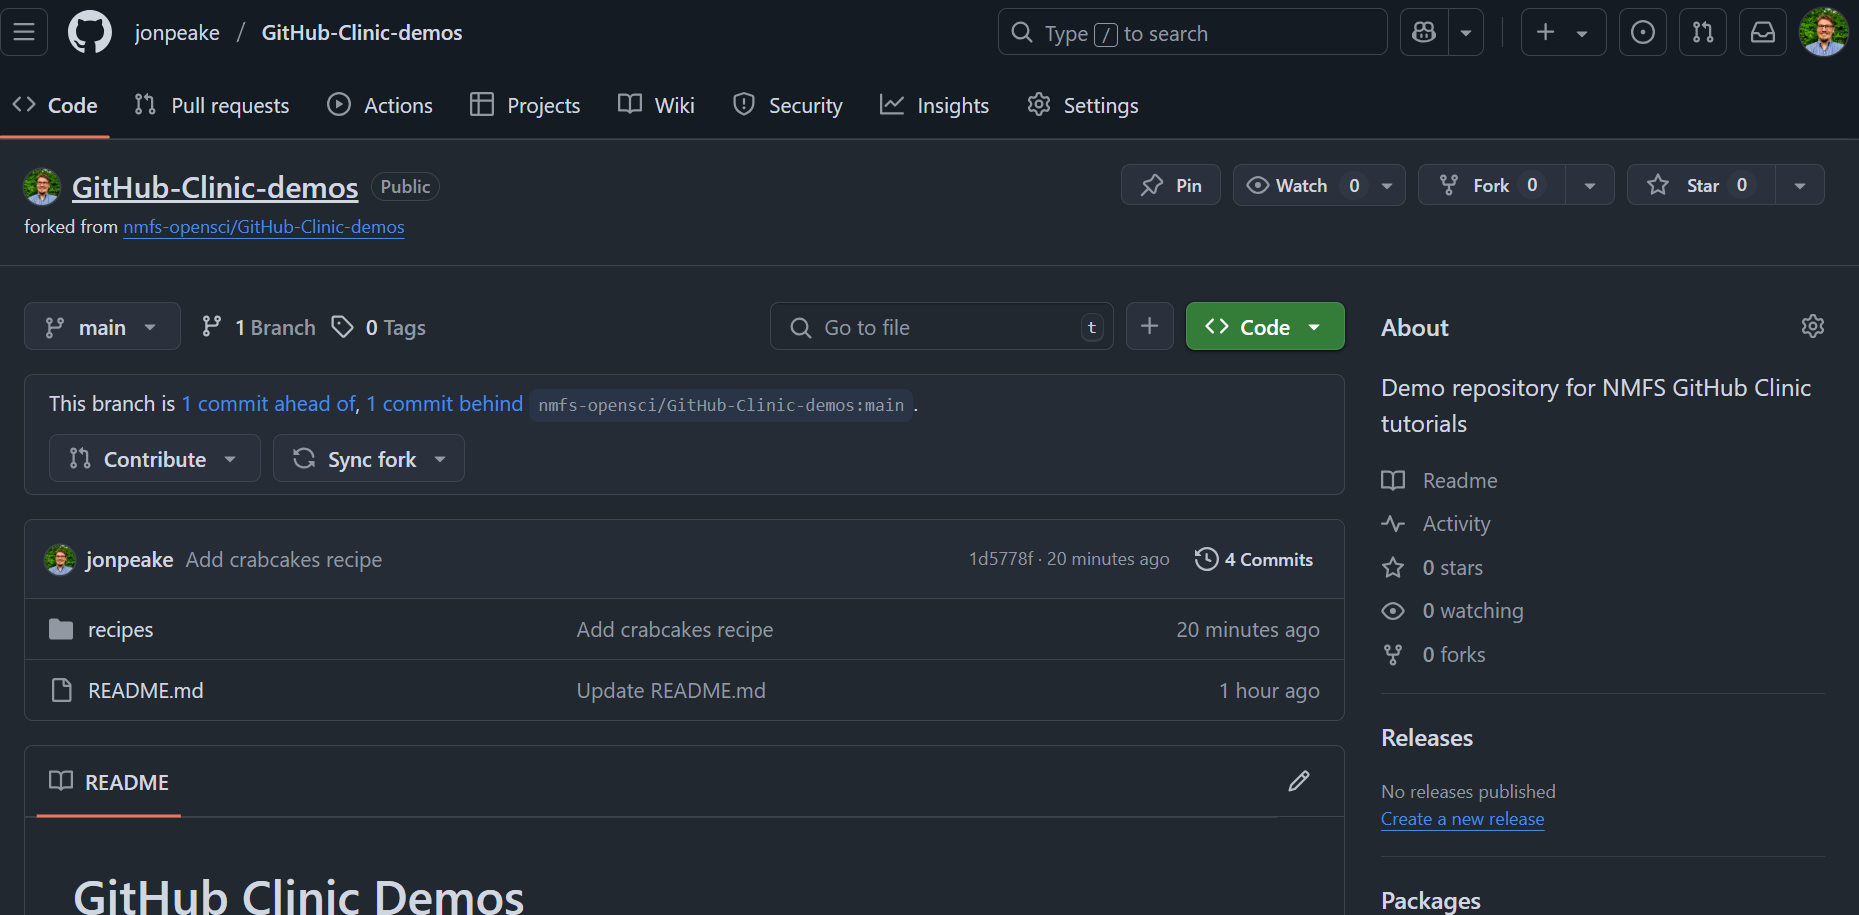
- Navigate to your forked repository.
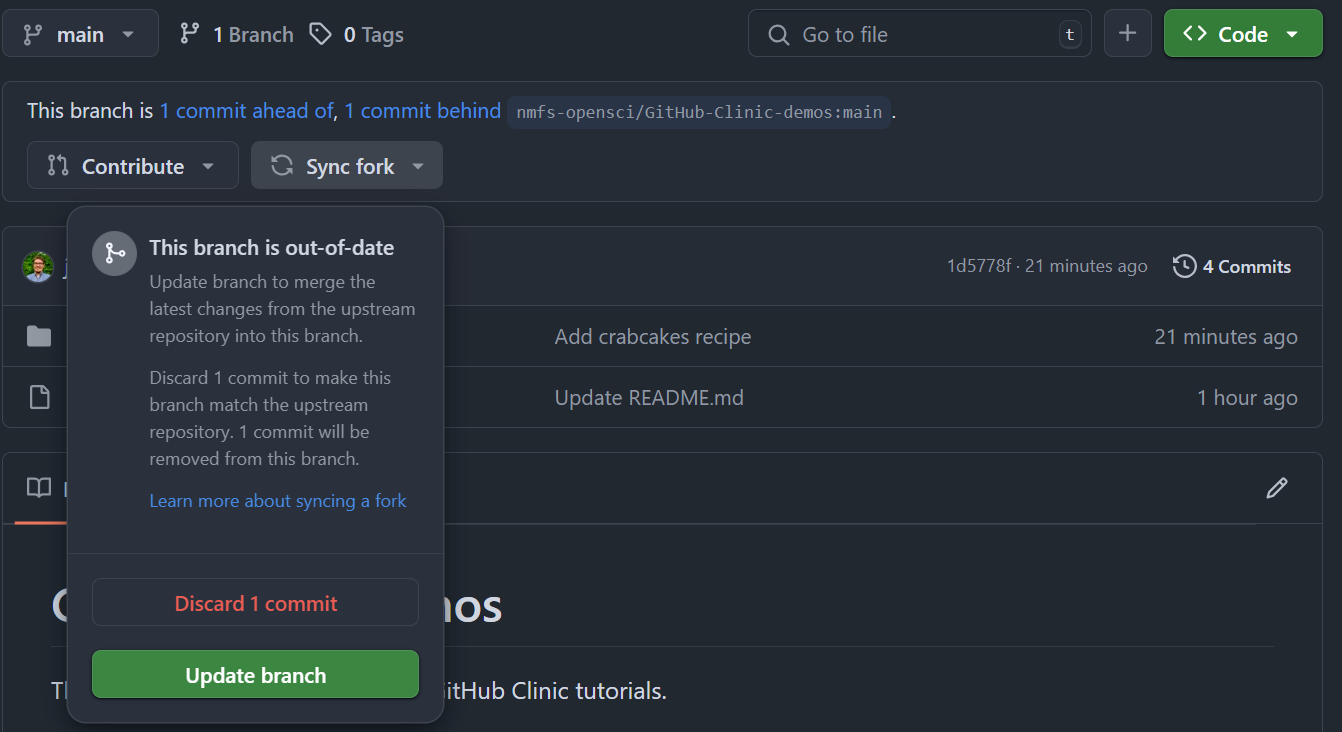
- Notice that the repository notifies you of the number of commits ahead of the parent and behind the parent your fork is. In that same message box, click the Sync fork dropdown, and click Update branch. Note that if you have commits that have not been merged into the parent, you can either discard your commit before the merge (so your fork matches the parent) or keep it and merge the changes from the parent into your fork.****
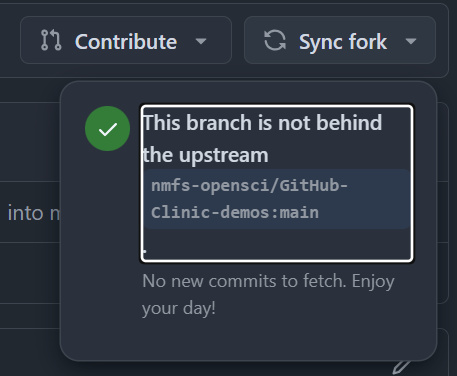
- To verify that your merge worked, click the Sync fork dropdown again. If everything worked, you should have a message that your branch is not behind the upstream (parent) repository
Tutorial: Making and merging a branch
For this tutorial, we’re going to be forking a demo repository (https://github.com/nmfs-opensci/GitHub-Clinic-demos), making a branch on our forked copies, editing our forked copies, and creating a pull request to contribute back to the main branch. Follow along on your own account.
Step 1: Fork the repository
- Open the demo repository in GitHub.
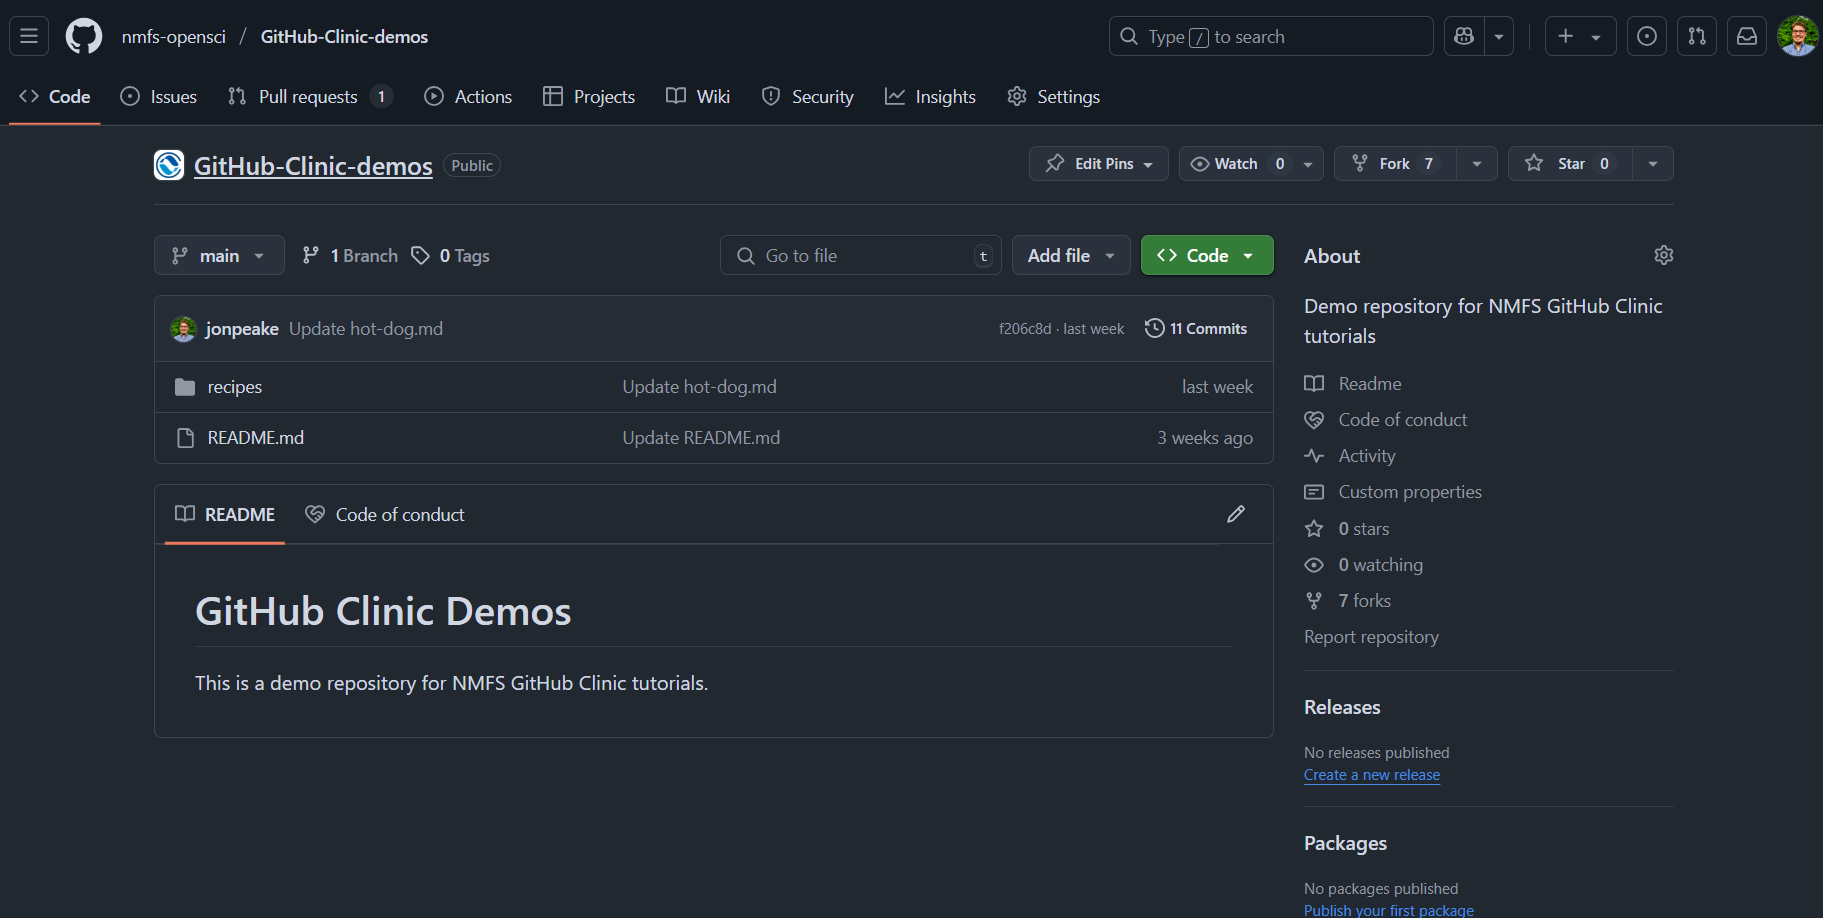
- At the top of the repository, click the Fork button

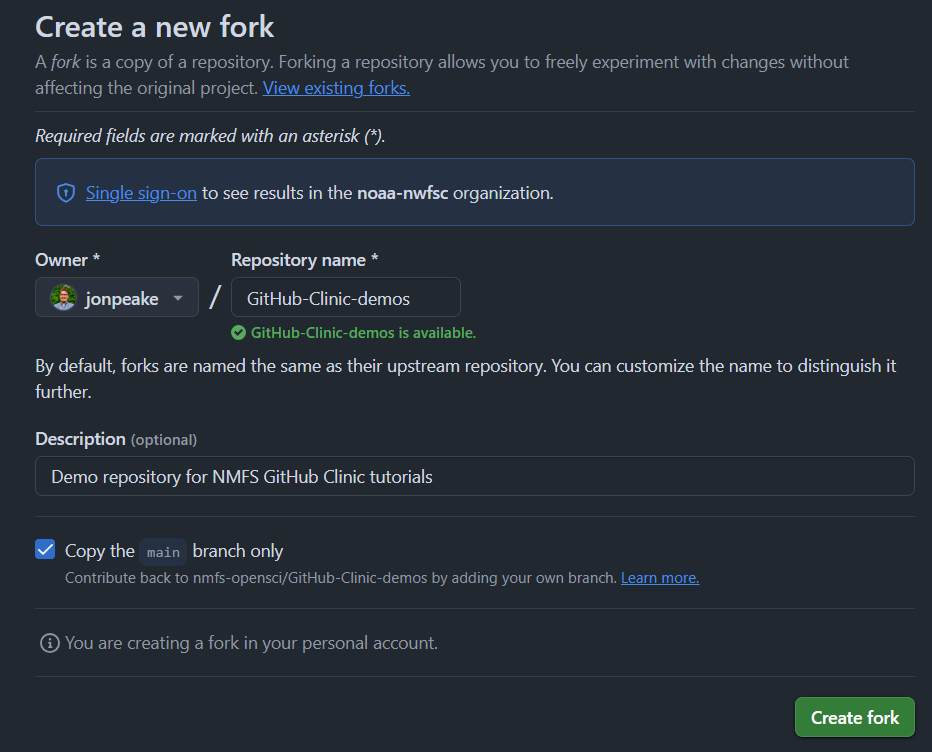
- Keep everything default (your account should be listed under Owner, and the Repository name should be pre-filled for you). Click the green Create Fork button.
Step 2: Create a new branch
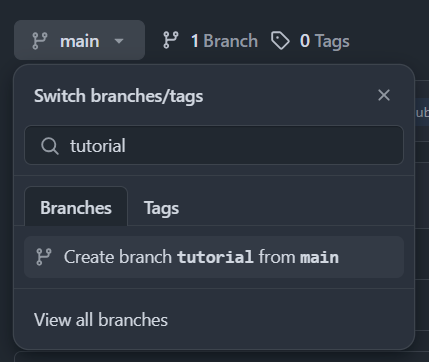
- On the Code tab of your forked repository, click the dropdown menu where it says
main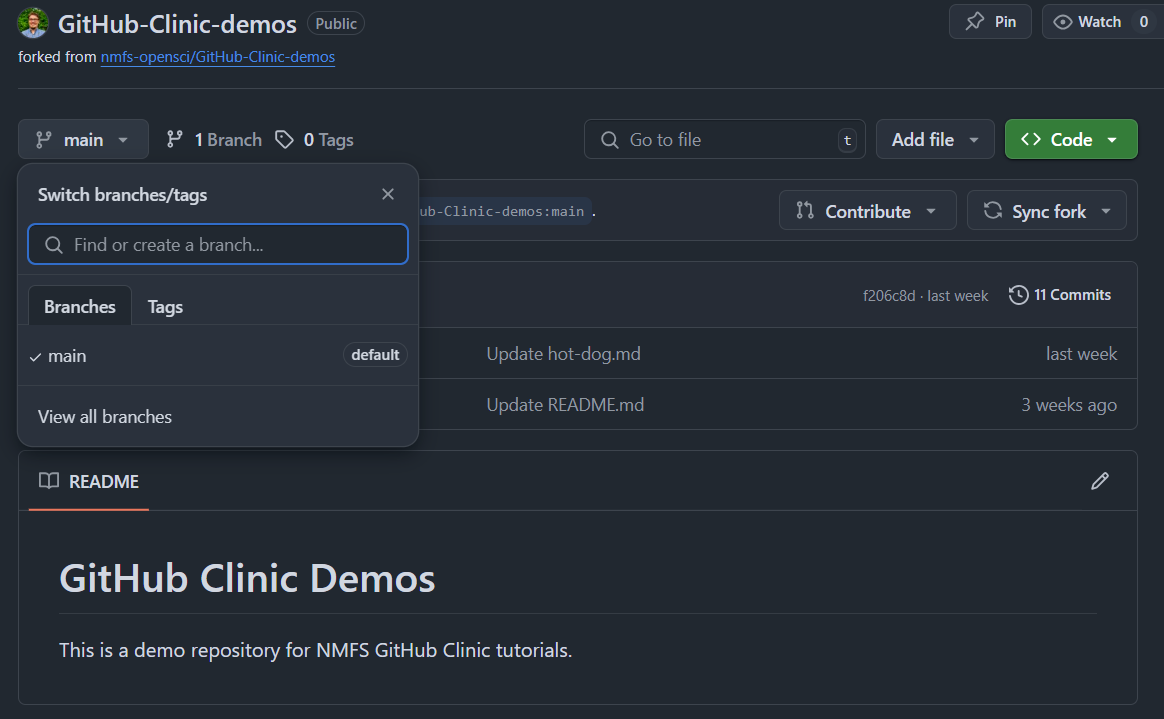
- In the text box where it says “Find or create a branch”, type the name of your branch. Let’s call it
tutorial. Click the Create branchtutorialfrommainbutton to create your branch.
Step 2: Add content to your new branch
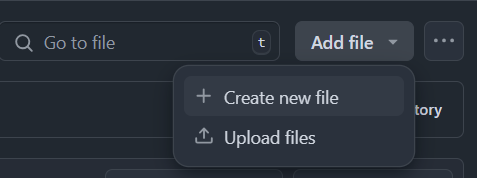
- Let’s add a new file to our repository. Click the Add file (
+) drop-down menu, and click Create new file.
- Name your file
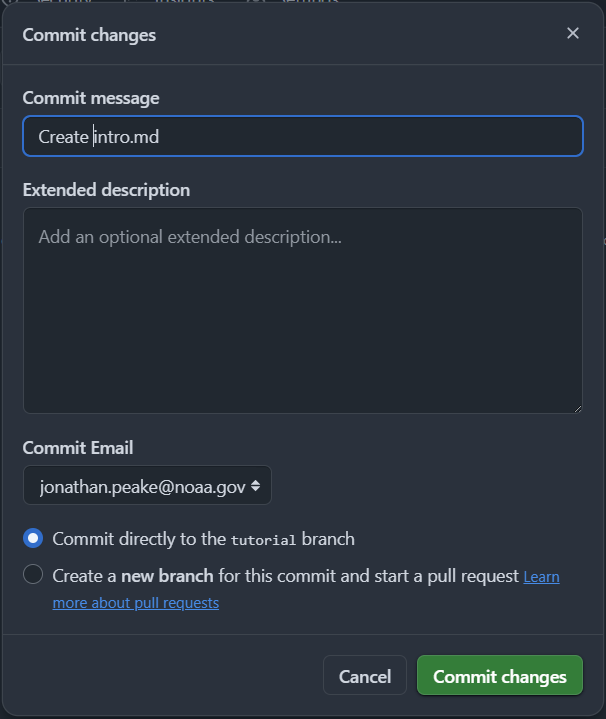
intro.mdand add some content to your file. If you’d like, you can copy the following markdown chunk and paste it into your file.

# Introduction

This repository serves as a sandbox demo for the NOAA Fisheries GitHub Clinic. Feel free to fork this repository and use it to practice Git and GitHub tools and methods.- Commit your changes to the
tutorialbranch.
Step 3: Create a pull request
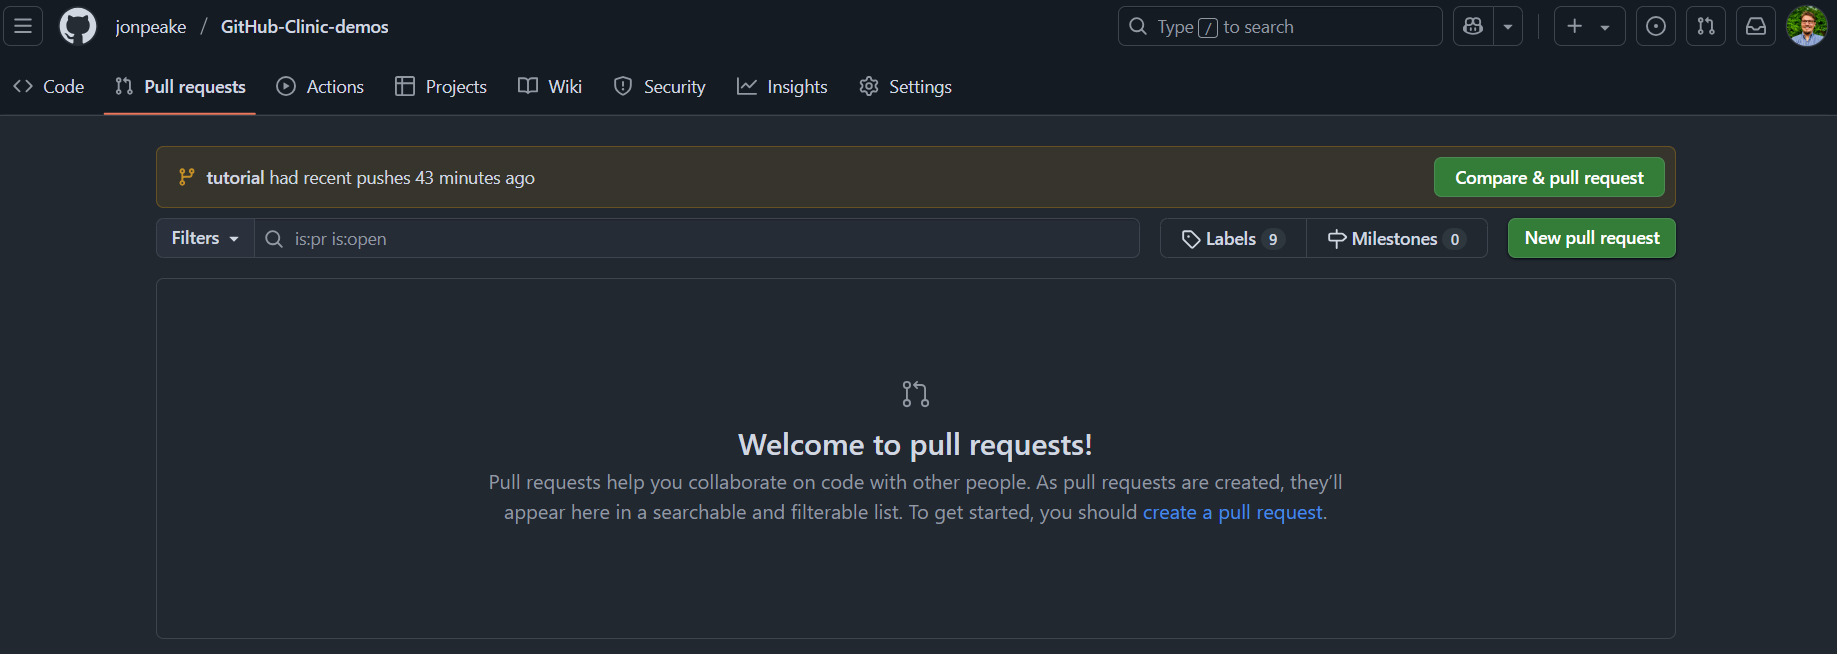
- Click the Pull requests tab at the top of the repository. GitHub should recognize that you made a push to your
tutorialbranch. Click the green Compare & pull request button to start a pull request to merge the pushes fromtutorialintomain.
- Notice that because we’re working from a forked repository, GitHub will automatically fill in the parent repository (
nmfs-opensci/GitHub-Clinic-demos) as the repository to merge into. For this tutorial, we instead will merge into themainbranch of our forked copy of the repository. Click the drop-down menu where it says “base repository:” and select your forked copy.
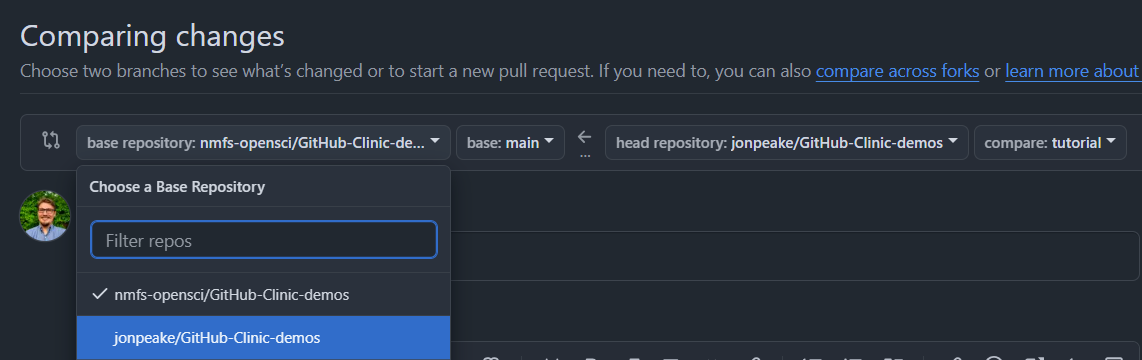
- GitHub will pre-populate the title of our pull request based on the commit message. If we have multiple commits, we would need to make our own pull request title. Make sure the title is clear and concise, and add a detailed blurb to the description section. For our example, this can be as simple as describing the intent of the pull request. For more complex pull requests that involve adding to or modifying code and text in multiple files, we want to guide the reviewer through your changes as much as possible. Be as detailed as you need to be to convey the changes that were made and why they were made. You can even add images, screenshots, videos, and links to showcase how the changes you made are reflected for the end user.
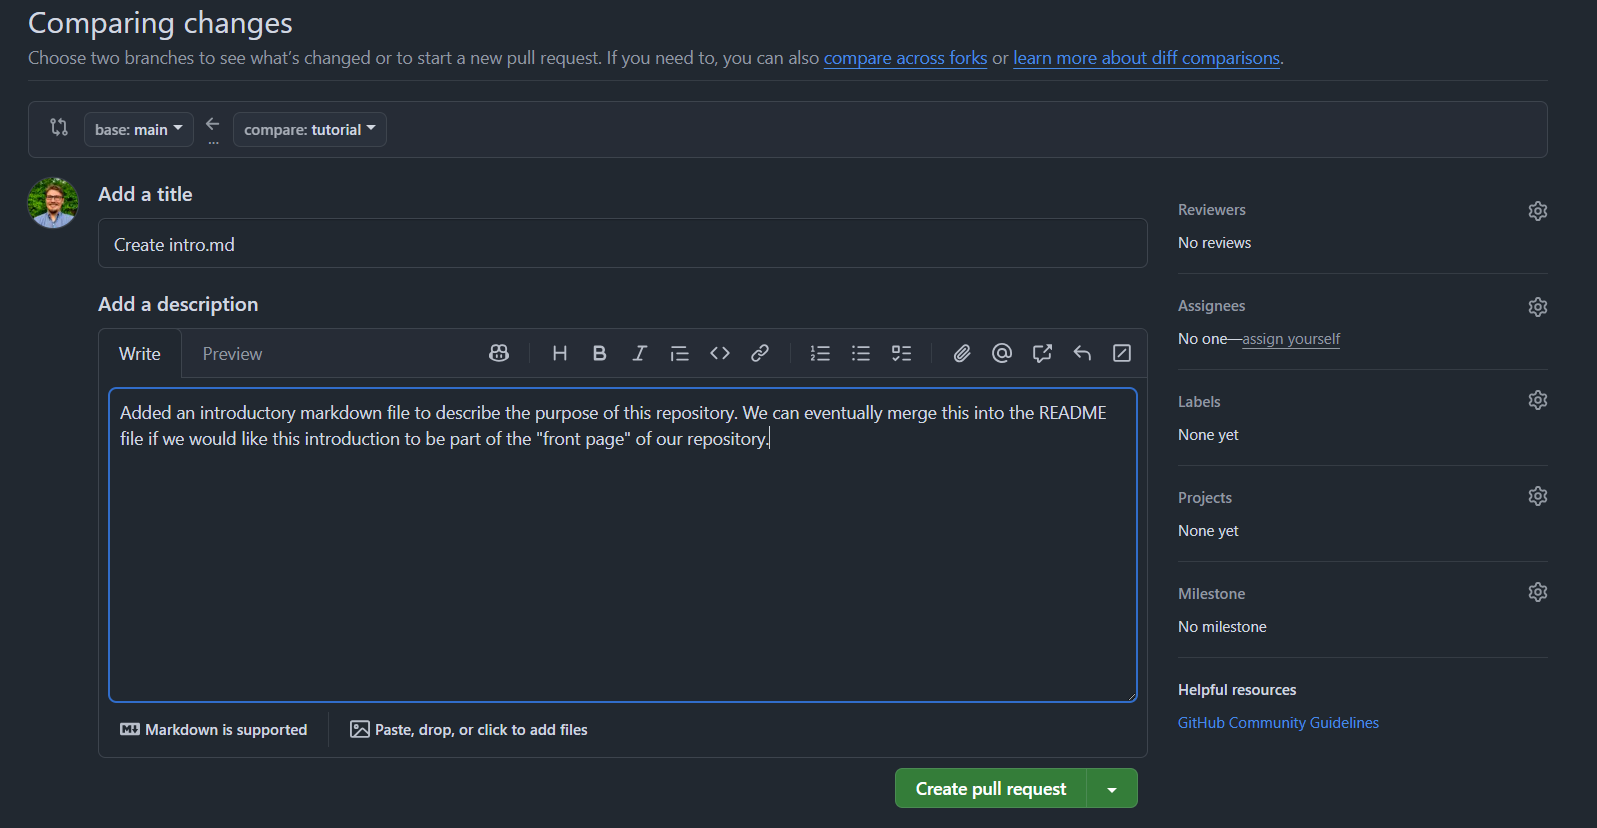
- Click the green Create pull request button to finalize our pull request.
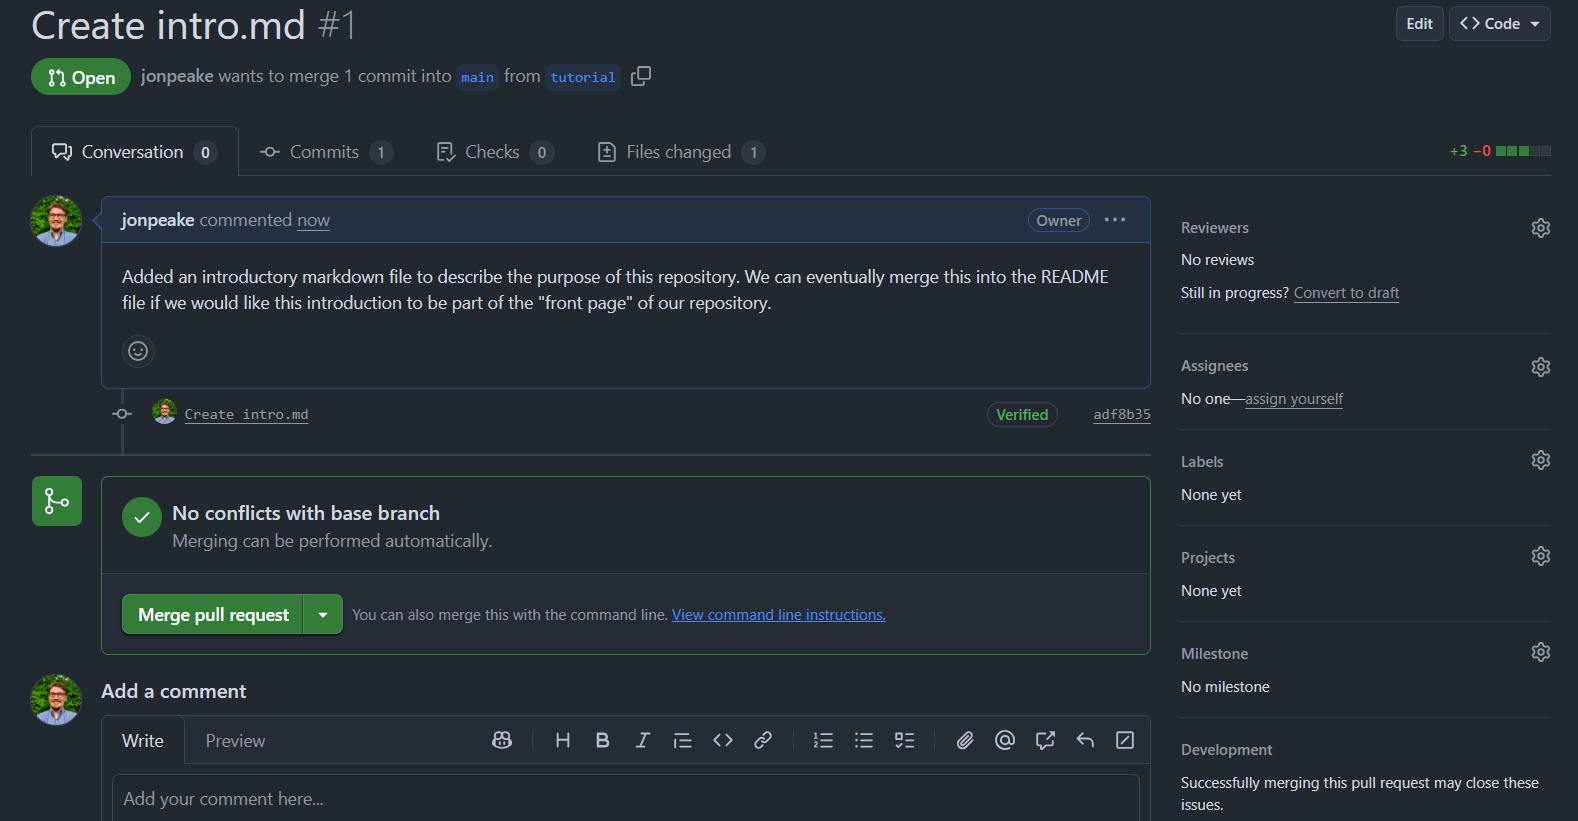
Step 4: Review and merge your pull request
Reviewing a pull request is an important step of the collaborative process on GitHub. Pull request reviews allow the owner of a repository or another collaborator to read through changes line-by-line, adding comments and proposing edits along the way. Think of a pull request review as being similar to a manuscript or report review using track changes.
Before we merge our changes into our main branch, let’s get some practice with reviewing pull requests. This step is not as important when you’re the only one working on a repository (like in our tutorial), but it’s good practice for future collaborations.
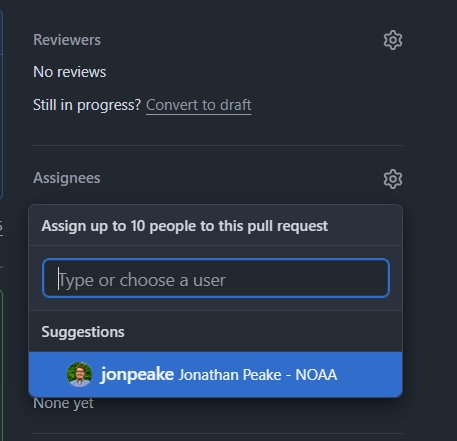
- Assign yourself as a reviewer to the pull request using the Assignees dropdown on the right-hand side of your pull request. In a collaborative setting, you can assign up to 10 of your collaborators.
- Navigate to the Files changed pane in the pull request. This is where we’ll conduct our review.
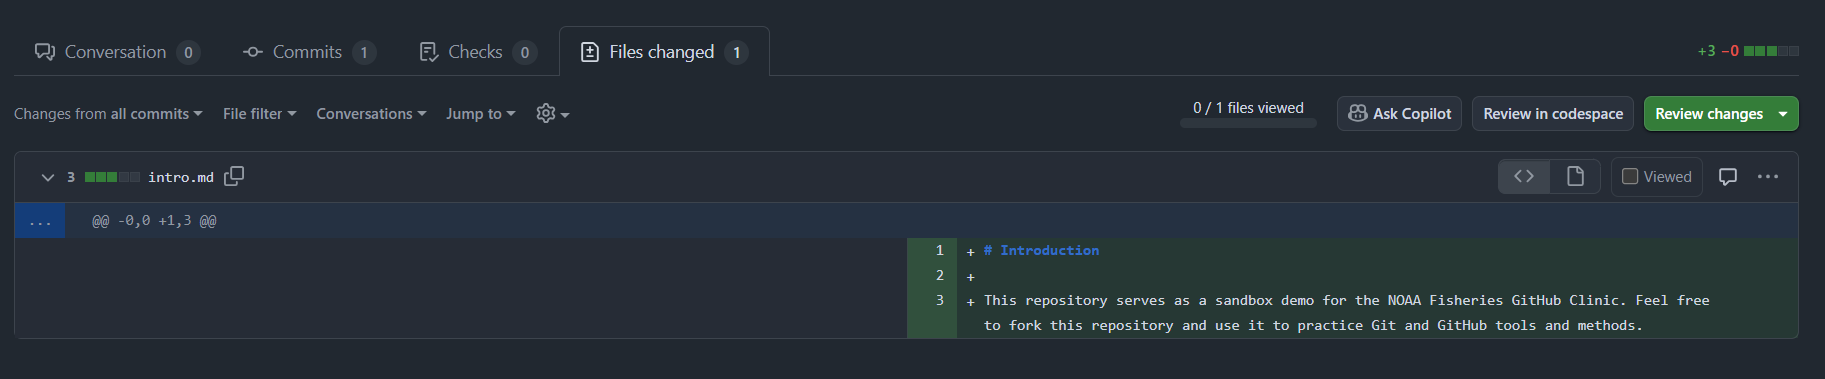
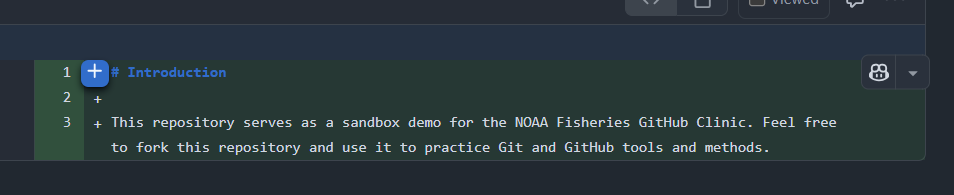
- Just like in a manuscript peer review, we can leave a narrative review with general comments and recommendations, and we can also add comments and propose edits to specific lines. Let’s add a comment to change the first-level heading of our markdown file. Hover your mouse in the space between the line numbers and the content. You’ll see a highlighted
+icon appear next to each line. Click the+icon next to line 1.
 icon next to the Preview tab. This icon is the Add a suggestion icon. Notice that when you click this icon, it inserts a code snippet into our dialog box with the label
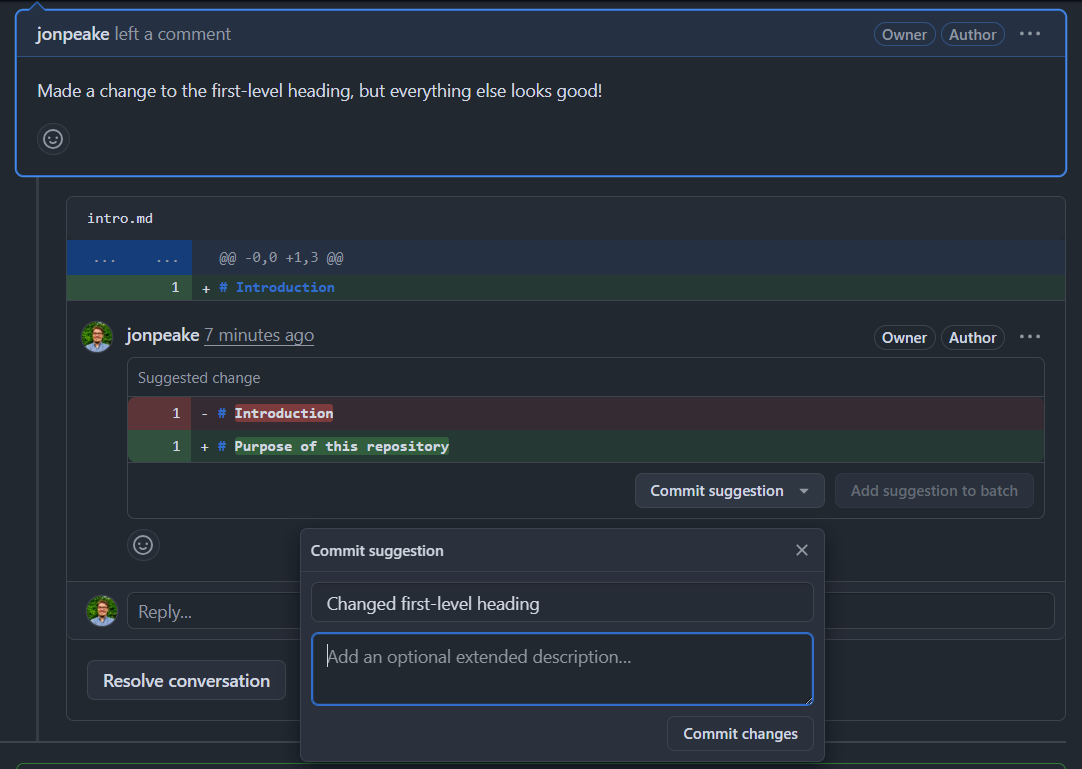
 suggestion. Inside this code snippet, suggest a change to the# Introductionheader to read# Purpose of this repository.
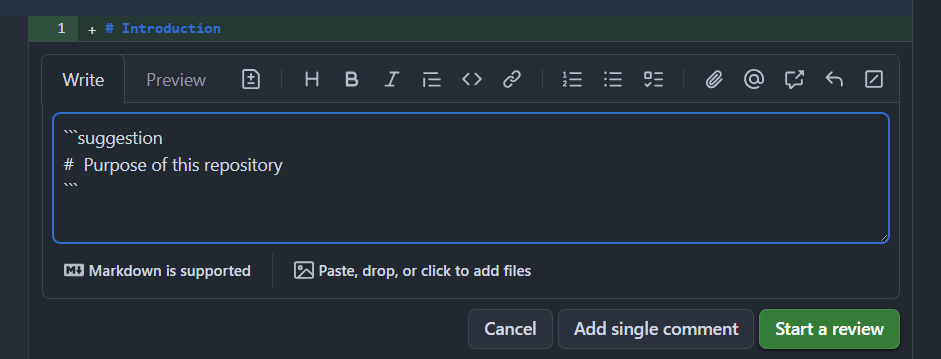
- From here, we can either add our suggestion as a single comment to the pull request conversation, or start a review based on this suggestion. Let’s go ahead and click the green Start a review button.
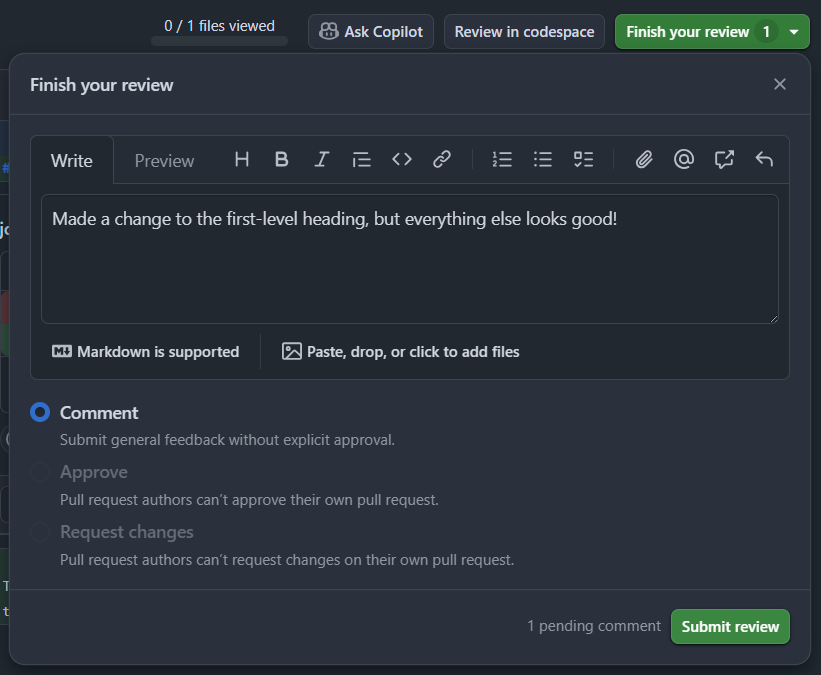
- From here, we can add more line-by-line comments and suggestions, or we can finish our review with our general impressions. Let’s click the green Finish your review button (notice there is a ticker that tracks the number of line-by-line comments/suggestions).
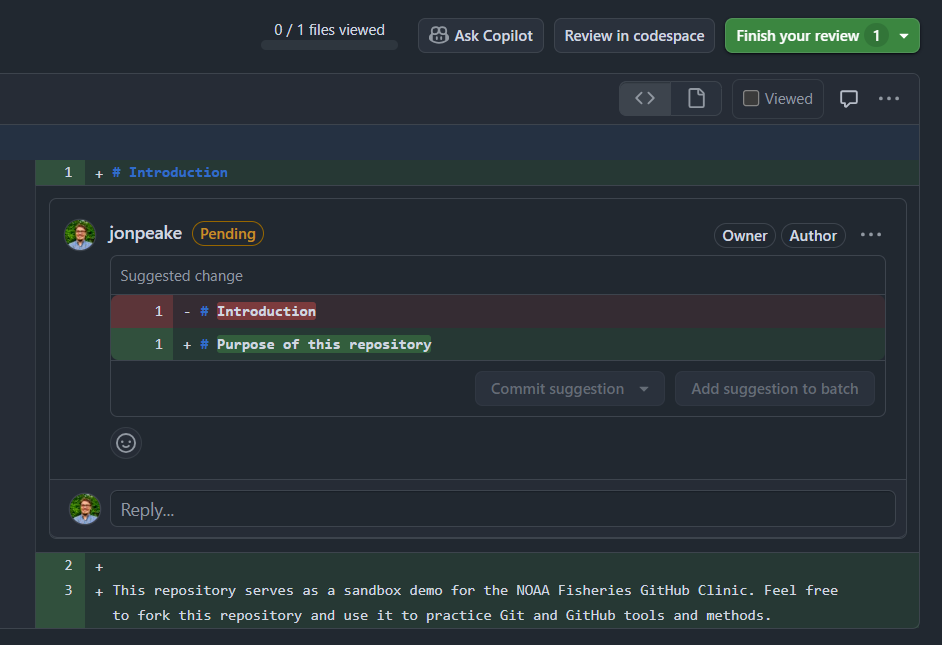
- Add a comment to your review summarizing your comments and changes and giving overall impressions. Click the green Submit review button to finalize your review.
- As the original creator of the pull request, you can now commit the proposed change directly to the pull request, continue the conversation to refine the suggestion, or decline the suggestion and Resolve the conversation. Let’s commit the proposed change from the pull request review.
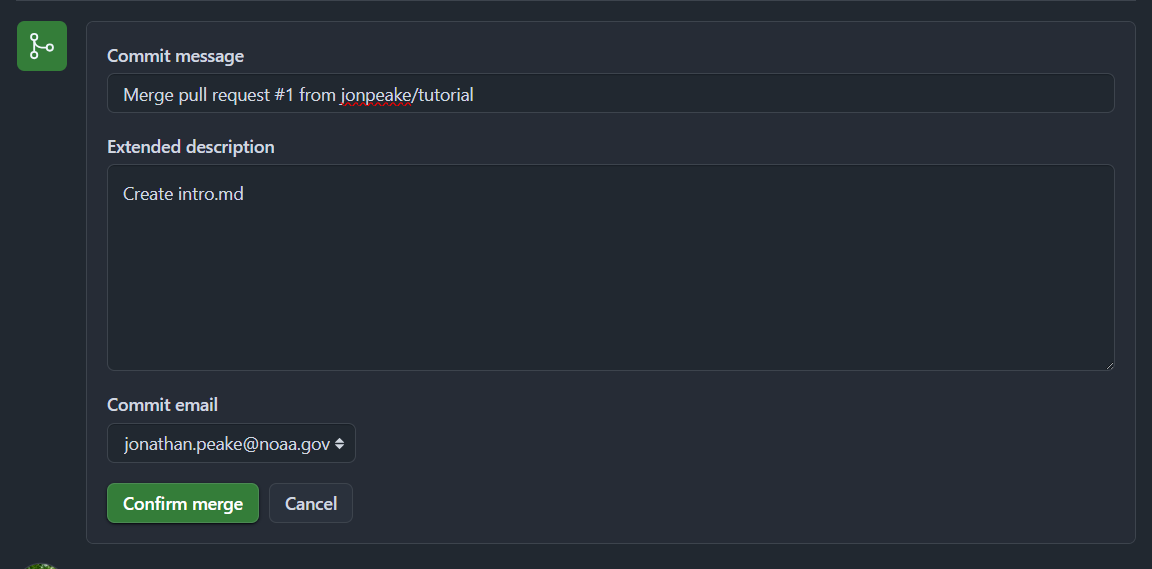
- Once your change has been committed, we’re ready to merge the pull request! Click the green Merge pull request button, and confirm your merge with a merge commit.

- Congratulations! You have merged a pull request from a branch. You can now optionally delete the branch (don’t worry, you can always restore it from the pull request). During the next GitHub Clinic session on Git Workflows, we’ll discuss reasons and scenarios where you may want to keep a permanent branch versus creating and deleting ephemeral branches for development. For now, let’s go ahead and delete our branch to close out this tutorial.