chmod 400 ~/<key location>
ssh -i ~/<key location>/Centos8.cer <vm-username>@<public ip-address>Centos Set-up
Setting up a multi-user JupyterHub on Centos 7 VM
This is my notes for setting this up on a Centos 8 (Linux distribution) server. Jump to the “Summary” section to see only the instructions without explanations.
All the commands are run in a shell (bash)
References:
- https://jupyterhub.readthedocs.io/en/1.2.0/installation-guide-hard.html This is an old version (1.2.0) while the newest verson of JupyterHub is 4+. However the 4+ docs do not cover a simple bare metal (own server installation).
- https://jupyterhub-dockerspawner.readthedocs.io/en/latest/install.html
Set up VM on Azure
- Created a Centos 8.3 server on Azure: https://portal.azure.com/#create/cloud-infrastructure-services.centos-8-3centos-8-3
- I didn’t do anything special for set-up. Choose SSH with key.
- Once it is created, I went to the dashboard and selected my VM. The dashboard has a “Connect” button to get to the shell and it shows the public IP address.
- I had to create a special security rule to allow me to ssh into the public IP address to connect. Normally I use the cloud shell to connect, but Azure would not let me connect via the cloud shell for a server since it wanted upgraded security package and I cannot do that with my work subscription.
- Then I saved the key somewhere on my computer and
On VM check set-up
I ssh-ed into the VM with
ssh -i <path to key downloaded from Azure> eeholmes@<public ip address>Make sure you are root
Getting the JupyterHub set up needs to be done as root. First make sure you have an admin password. When I set up my Azure VM, I did not set a password. So first
sudo passwd <your username>and set a password. Then switch to root if you are not signed in as root
sudo -iCheck for Python
You will need Python 3.6+ installed. Open a terminal window and run python3 --version or python --version to see if Python is installed and what the version is.
Check your operating system (OS) with
cat /etc/os-releaseCheck for conda
You will need conda (or miniconda) for these instructions. conda (and miniconda) take care of checking that all our packages will be inter-operable. It is best to install JupyterHub into a clean environment. That way you minimize chances of conflicts and your environment will solve (figure out any conflicts) much much faster.
Check for conda with
conda listIf it doesn’t show a list of environments, then you need to install miniconda. Installation instructions. Read about miniconda for scientists from Software Carpentries here.
This is what I used to install miniconda from these instructions. Note install miniconda in some place like /opt/miniconda3 where all users will have access to `/opt/miniconda3/bin. We don’t want to install in /root/ for example or the admin users home directory.
mkdir -p /opt/miniconda3
wget https://repo.anaconda.com/miniconda/Miniconda3-latest-Linux-x86_64.sh -O /opt/miniconda3/miniconda.sh
bash /opt/miniconda3/miniconda.sh -b -u -p /opt/miniconda3
rm -rf /opt/miniconda3/miniconda.sh
Then initialize to set up the path. Note I am using bash. You’ll need to change if you are using zsh.
/opt/miniconda3/bin/conda init bash
source ~/.bashrc
note will need to do something else to add the conda binary to all the users’ paths
Create the conda environment
Create the conda environment for the jupyterhub installation. Installation will be in a directory with all the files for packages. Then activate it (enter it), and get the location of the environment (folder).
All the commands below are in the terminal window on your VM/server.
Create the environment named jupyterhub with python and jupyterhub (module). After creating, activate (enter) that environment. Then install jupyterlab, notebook and dockerspawner into the environment. Note the jupyterhub after -n is the name of the environment.
conda create -n jupyterhub pythonThen activate (enter) that environment
conda activate jupyterhubThen install jupyterhub here
conda install -c conda-forge jupyterhuband then jupyterlab
conda install -c conda-forge jupyterlab notebookSet a variable for env path
The environment has a folder with all the packages and binaries that we install. We are going to need to know the location of that folder. Get the location with
conda env listOn the VM I set up, the folder location is
/opt/miniconda3/envs/jupyterhubYours could be something entirely different. On another server with anaconda (a not-free conda package resolver), the folder was
/SHARE/anaconda3/envs/jupterhub/We are going to be saving the configuration files for our JupyterHub in this folder. Let’s save the path to a variable so we don’t have to keep entering the whole path.
JHUBENV=/opt/miniconda3/envs/jupyterhubMake sure users can read and execute this folder. They need to in order to be able to spawn instances for the hub.
chmod 755 $JHUBENVYou should now be able to start the hub, but you will not be able to access it yet because you need to open the 8000 port. Type
$JHUBENV/bin/jupyterhuband check that it starts. Then use Cntl-C to stop the hub.
Create a user on the VM
By default, any user on the server will be able to login. Let’s create a test user so that we are not logging into our hub with the root user password. We will be using “http” until we secure it so passwords are potentially exposed.
useradd jhuband give it a password when it asks.
Open the 8000 port
FirewallD was not running on my Azure Centos server, so I started it up to manage the ports.
sudo systemctl enable firewalld
sudo systemctl start firewalld
Find out the Public IP address for the server you are on; it’s listed on the Azure overview and networking page for the VM in the Azure portal. Then open the 8000 port.
First find out what ports are open through the firewall
sudo firewall-cmd --list-portsAdd the 8000 port, reload and recheck that it appears.
sudo firewall-cmd  --permanent --add-port 8000/tcp
sudo firewall-cmd --reload
sudo firewall-cmd --list-ports
Because I am on an Azure VM, I also have to set up a networking rule to allow the 8000 port. By default, all public access to the server is blocked. Go to the Azure dashboard, select your VM, then select Networking under Settings, and then click Add Inbound Port rule. I am pretty sure you need to select “http” instead of “https”.
Once the port is open, you should be able to reach your JupyterHub at http://XXX.XX.XX.XX:8000 (replace the XX’s with the Public IP address).
Background
The JupyterhHub is running by default on http://localhost:8000. This means that if you start the hub on a machine that you are logged into, you should be able to open a browser on that machine, enter http://localhost:8000 and the hub login page will appear. There are a few reasons that might not work
- You are ssh-ing into a server and don’t have a browser to open. The browser on the computer that you are ssh-ing from is the “localhost” in this case and you need the “localhost” to be the server.
- You are logged directly into your server, but it doesn’t have a browser installed.
However http://localhost:8000 is actually not very useful. We are trying to create a hub that others can log into from their browsers.
So you need to determine the Public IP address for the server you are on. This is the IP address that you could enter into a browser. If you enter http://XXX.XX.XX.XX (replace with actual IP), then you should see a page of some sort. This indicates that the server is working. If you are on an internal network, then you will only be able to load the address if you are also on that network. But for security reason, ports will not be open by default. You need to open the 8000 port so that http://XXX.XX.XX.XX:8000 will be found.
Log in!
At this point, you should be able to login with the jhub test account.
Set up a configuration file
So far, we have started the hub with the default configuration. We are going to need to customize it. For that we need a configuration file. We will create this in the folder where the environment files are.
sudo mkdir -p $JHUBENV/etc/jupyterhub/
cd $JHUBENV/etc/jupyterhub/
Next create the default configuration file jupyterhub_config.py.
sudo $JHUBENV/bin/jupyterhub --generate-configBecause we cd-d into the $JHUBENV/etc/jupyterhub/ directory, the file is created there. This default file is very long. Open up with
nano jupyterhub_config.pyUse F6 to find lines. Uncomment these two lines and save (Cntl-O, Enter, Cntl-X).
c.Spawner.http_timeout = 3600Make a new server service
Create the new unit file
At this point, after opening the port, you should be able to get to your JupyterHub by starting it with jupyterhub --ip XXX.XX.XX.XX --port=8000 and then browsing to http://XXX.XX.XX.XX:8000. But you hub is going to be stopped whenever the server is rebooted. So next we need to set up a service for your service so that our hub starts automatically.
Create a new directory for the service unit file,
sudo mkdir -p $JHUBENV/etc/systemd
cd $JHUBENV/etc/systemd
Create the file and name jupyterhub.service. For example, using nano editor, we do
nano jupyterhub.serviceAnd into that file we put the following. Replace /opt/miniconda3/envs/jupyterhub with the actual path to the jupyterhub environment folder.
[Unit]
Description=JupyterHub
After=syslog.target network.target

[Service]
User=root
Environment="PATH=/bin:/usr/local/sbin:/usr/local/bin:/usr/sbin:/usr/bin:/opt/miniconda3/envs/jupyterhub/bin"
ExecStart=/opt/miniconda3/envs/jupyterhub/bin/jupyterhub -f /opt/miniconda3/envs/jupyterhub/etc/jupyterhub/jupyterhub_config.py

[Install]
WantedBy=multi-user.target
Next we make systemd aware of the new service.
Create a symlink file in the folder where all the server services are kept. And tell systemd to reload its configuration files
sudo ln -s $JHUBENV/etc/systemd/jupyterhub.service /etc/systemd/system/jupyterhub.service
sudo systemctl daemon-reload
Make sure SELinux doesn’t block our service
SELinux (security for the server) checks that files that are used have the correct label. All our files have generic file labels. If you do,
ls -Z $JHUBENV/etc/systemd/You will see that the file label is unconfined_u:object_r:usr_t:s0. We need it to be
systemd_unit_file_tWe change the file label with
sudo chcon system_u:object_r:systemd_unit_file_t:s0 $JHUBENV/etc/systemd/jupyterhub.serviceSELinux will also object to the file label on all the binaries that we use to start up the JupyterHub (like jupyterhub) so we need to fix those file labels.
This will add bin_t label to all the binaries and check that it worked.
sudo find $JHUBENV/bin -type f -exec chcon system_u:object_r:bin_t:s0 {} \;
ls -Z $JHUBENV/bin
It got all the binaries but not the simlinks. Nonetheless it seemed to run ok.
Enable our new service
sudo systemctl enable jupyterhub.serviceThe service will start on reboot, but we can start it straight away using start:
sudo systemctl start jupyterhub.serviceCheck that it is running.
sudo systemctl status jupyterhub.serviceIf it fails, try
audit2why < /var/log/audit/audit.logto debug. It is likely to be an issue with SELinux blocking the service from starting.
Now our hub should be available on http:\\XXX.XX.XX.XX:8000. You can double check that it is listen on this port by running
netstat -tulnAt this point, you will need to address security if your hub is open to the web, as opposed to being on an internal network and only accessible to that network. Learn about that here.
Set up Docker for user environment
When you log in the jupyter notebooks will be trying to use the Python environment that was created to install JupyterHub, this is not what we want. We will use a docker image to “spawn” the user environment. Read here for other approaches.
We are going to use dockerspawner so that we can use a docker image for our user environments. The user will work in these containerized environments and they won’t have access to any other files in the server. In order to share their work with others, the normal workflow would be to work in Git repos and share those repos to a GitHub (or GitLab server). Each user will have a home directory on the server for their files, but they won’t have access to other hub user directories nor will they have access to any other directories on the server.
Install docker
I am using Centos in this example
sudo yum install -y yum-utils
sudo yum-config-manager --add-repo https://download.docker.com/linux/centos/docker-ce.repo
Then we need to start docker
sudo systemctl start dockerInstall dockerspawner
I am going to be creating the user environment from a docker image, so I also want dockerspawner. Note dockerspawner installed docker-py but it was really old and threw errors so I installed separately to get the latest version. Note make sure you are in the jupyterhub conda env. You can run conda env list and use conda activate jupyterhub if you are not in it.
conda install -c conda-forge dockerspawner
conda install -c conda-forge docker-py
Jupyter images
The image that we use must have the jupyterhub and notebook module installed. The jupyterhub version needs to also match what you have on your hub.
Check the version on your server:
$JHUBENV/bin/jupyterhub -VFor demo purposes, we will use the jupyter images on DockerHub. We want to find an image with the same version of jupyterhub as we have on our server.
Edit the config file
Edit the jupyterhub_config.py file in $JHUB-ENV/etc/jupyterhub/ to add that we want to use DockerSpawner and specify the images that users should have access to. Users will get a drop down menu. Add these lines to jupyterhub_config.py. The hub bind url needs to be 0.0.0.0 because we are using a docker container for the individual user environments.
- https://discourse.jupyter.org/t/whats-the-main-difference-between-hub-connect-url-vs-hub-bind-url/3596/2
- Note
image_whitelistis deprecated as of dockerspawner 12.0. New name isallowed_images.
c = get_config()  #noqa
c.JupyterHub.port = 8000
c.JupyterHub.hub_bind_url = "http://0.0.0.0:8081"
c.JupyterHub.spawner_class = 'dockerspawner.DockerSpawner'
c.DockerSpawner.remove = True
c.Spawner.http_timeout = 3600
c.DockerSpawner.image_whitelist = {
    'datascience-r': 'jupyter/datascience-notebook:r-4.3.1',
    'scipy-notebook': 'jupyter/scipy-notebook:7e1a19a8427f',
}
Do a docker pull of the images so that they don’t have to be pulled the first time that a user chooses that image.
docker pull jupyter/datascience-notebook:r-4.3.1
docker pull jupyter/scipy-notebook:7e1a19a8427f
Now you can restart the service and the user can start a notebook with the specified images.
Create your own Docker images
Docker images that work with JupyterHub with Kubernetes will work with this set-up with the addition of jupyterhub and notebook.
Add the following to your Docker image
RUN pip3 install \
    'jupyter-rsession-proxy' \
    'jupyterhub==3.1.*' \
    'notebook==6.*' \
    'jupyterlab'

CMD ["jupyterhub-singleuser"]
Example using rocker image. Code added to make the home directory home/jovyan.
FROM rocker/binder:4.3

USER root
RUN usermod -d /home/jovyan rstudio
RUN mkdir /home/jovyan
RUN chown rstudio:rstudio /home/jovyan
USER rstudio

RUN pip3 install \
    'jupyter-rsession-proxy' \
    'jupyterhub==3.1.*' \
    'notebook==6.*' \
    'jupyterlab'

WORKDIR /home/jovyan

CMD ["jupyterhub-singleuser"]
Example using openscapes/rocker
FROM openscapes/rocker:a7596b5

RUN pip3 install \
    'jupyter-rsession-proxy' \
    'jupyterhub==3.1.*' \
    'notebook==6.*' \
    'jupyterlab'

USER root
RUN mkdir /home/jovyan
RUN chown rstudio:rstudio /home/jovyan
USER rstudio

CMD ["jupyterhub-singleuser"]
Special note regarding rocker images
The default home directory for rocker images is home/rstudio but the default for JupyterHub is home/jovyan.
Persistent volume
Add the following to the config file to create a persistent volume.
notebook_dir = '/home/jovyan'
c.DockerSpawner.notebook_dir = notebook_dir

# Mount the real user's Docker volume on the host to the notebook user's
# notebook directory in the container
c.DockerSpawner.volumes = { 'jupyter-{username}': notebook_dir }
User environment customization
Memory limits and guarantees
You can set memory limits on the containers that are spawned for users by adding limits. Read the documentation here.
For example:
c.DockerSpawner.mem_limit = '8G'
c.DockerSpawner.mem_guarantee = '1G'
c.DockerSpawner.cpu_guarantee = 0.5
c.DockerSpawner.cpu_limit = 1
If that doesn’t work try
c.Spawner.mem_limit = '2G'I believe you can specify as a drop-down to give the user choices:
c.DockerSpawner.mem_guarantee = {
    '1G': '1G',
    '2G': '2G',
    '8G': '8G',
}Setting up https
If you are using a public IP address, rather than being on a private network, you need to set up https so that content (passwords and everything else) is not visible. Read how to do that here.
These instructions set up this url: https://dhub.bluemountain123.live
GitHub authentication
After you have https set-up, we can set up authentication via a GitHub teams in a GitHub organization. Read other ways to authenticate (create users) here.
https://oauthenticator.readthedocs.io/en/latest/tutorials/provider-specific-setup/providers/github.html
Create a new Oauth Application on GitHub
This Oauth application is going to be associated with your (personal) GitHub account, but you will use a team on a GitHub organization that you are owner of for the users who are allowed to log into your JupyterHub.
Log into GitHub and go to GitHub > Settings > Developer Settings > New Oauth Application
Look carefully at how I filled in the boxes. Change the URL and the name of the application.
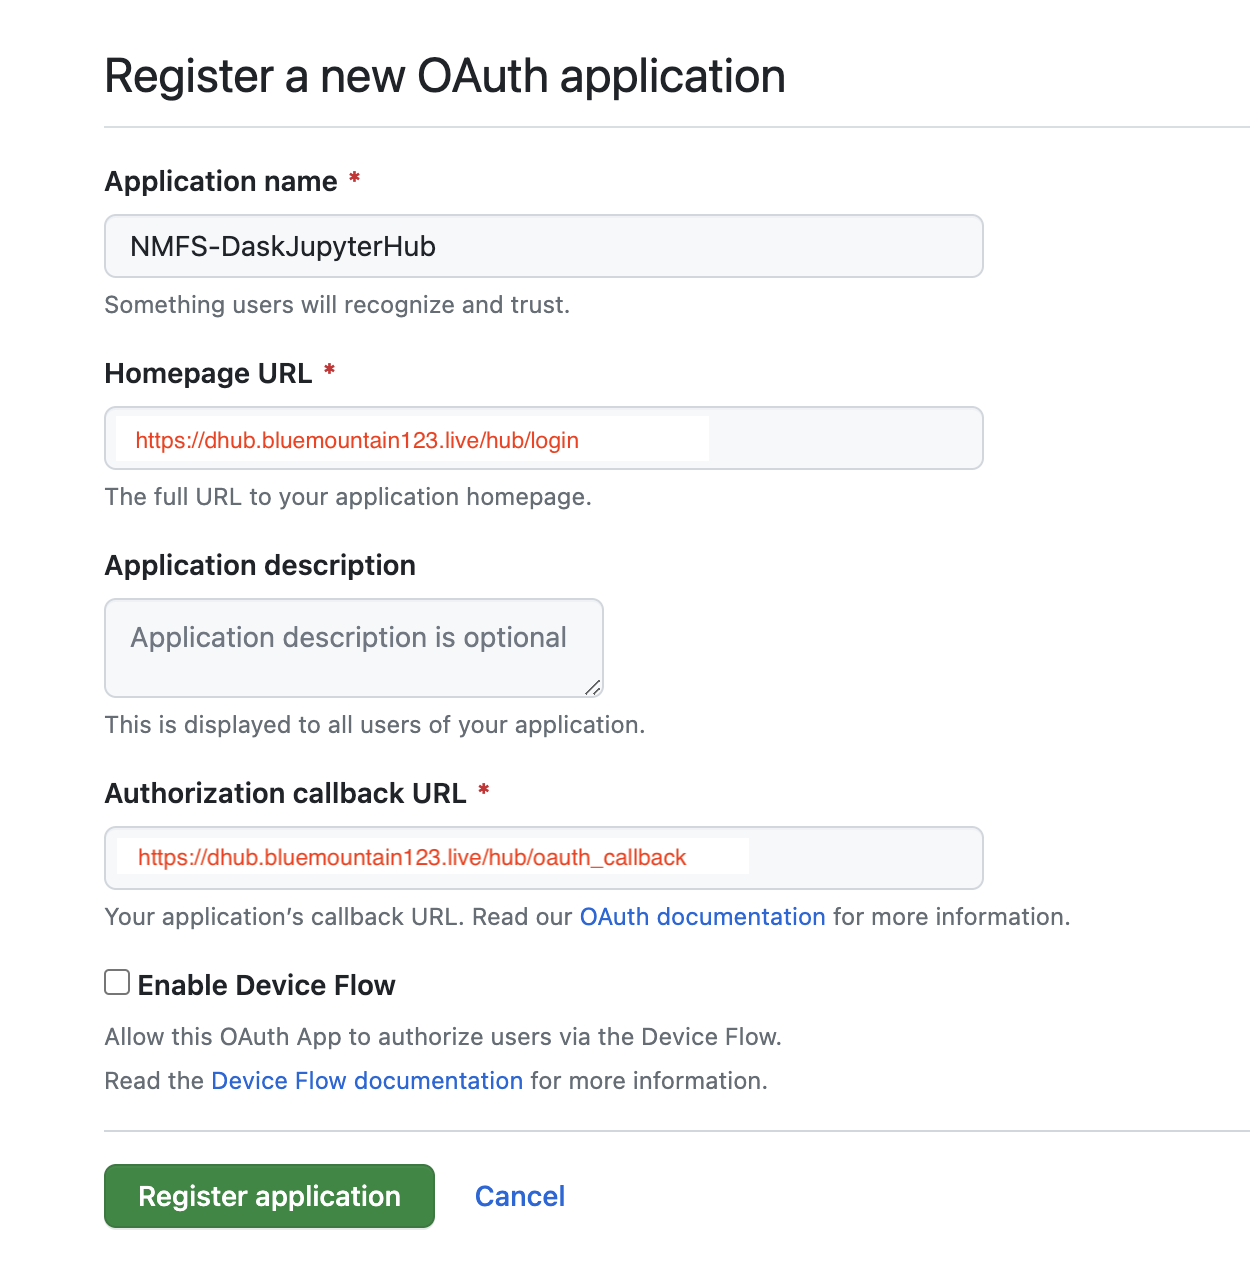
Next you will see something like this
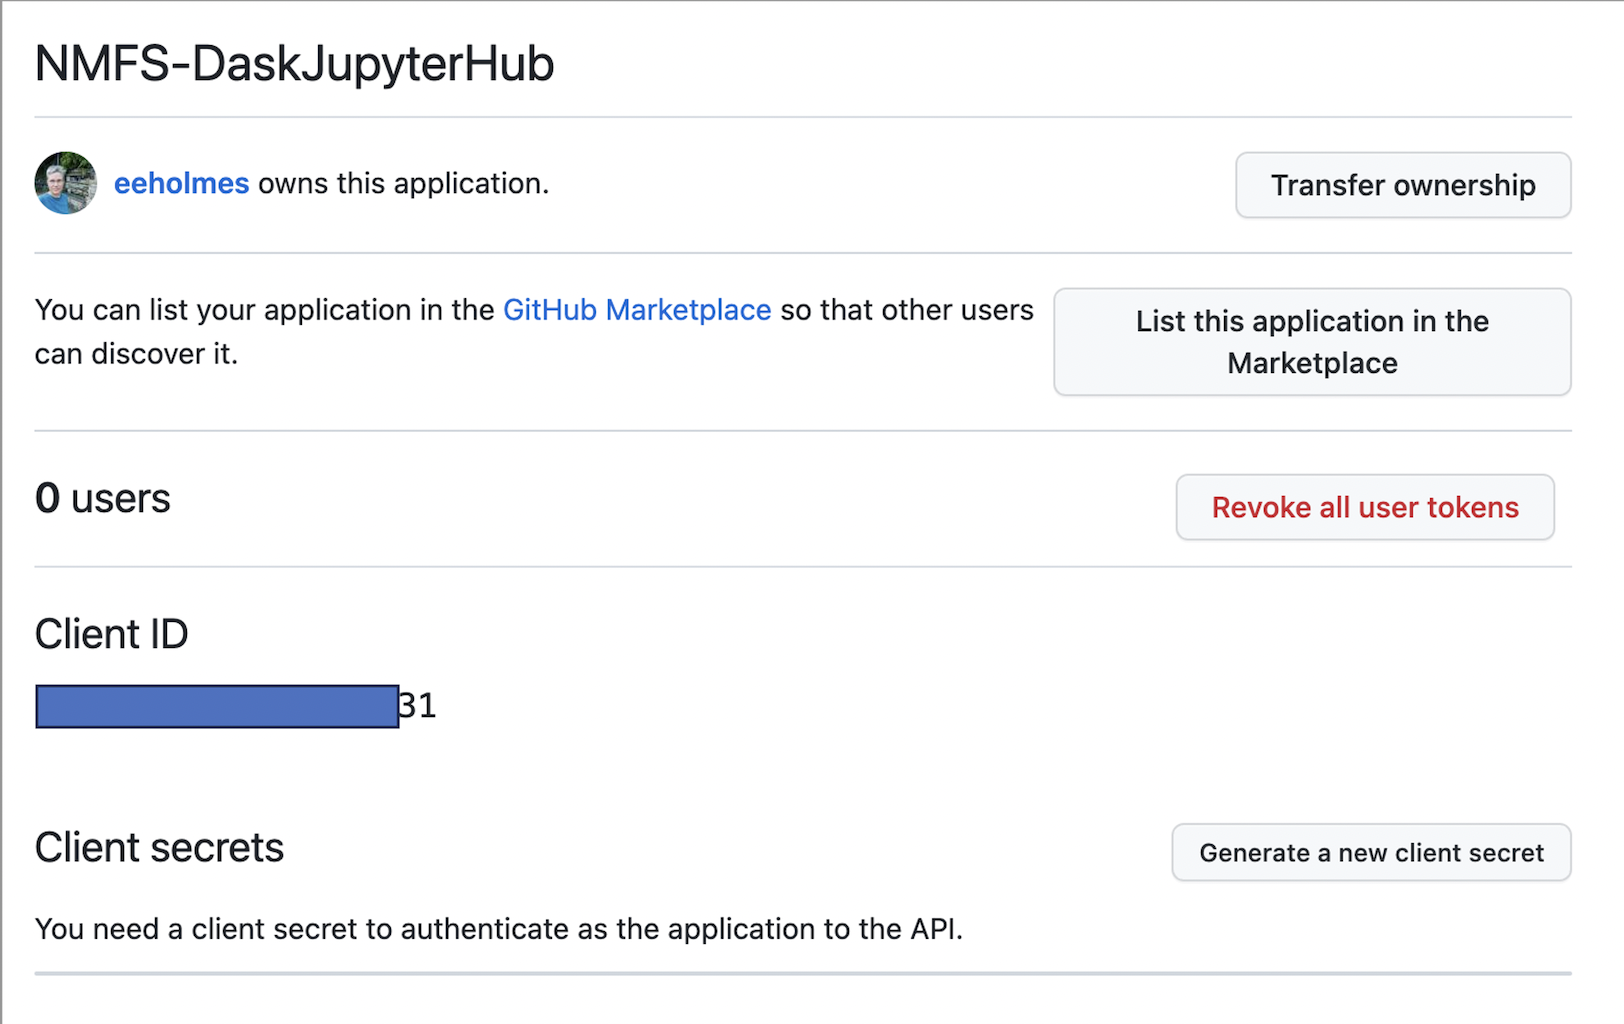
You need to copy the ID and then click the create secrets button and save the secret. You will need those in the next step.
Create a team in your GitHub organization
You will be added by default and add anyone else who needs access to the hub. Let’s say your GitHub organization is MyOrg and the team is called JHub. So then the allowed organization is MyOrg:JHub. You can leave off :JHub if you want to allow all members of the organization to log in.
Install
Install the oauthenticator package. Make sure you are in the jupyterhub conda environment.
# check what environment you are in and switch if needed
# conda env list
# conda activate jupyterhub
conda install -c conda-forge oauthenticator
Edit the jupyterhub_config.py file
Edit with something like
cd /opt/miniconda3/envs/jupyterhub/etc/jupyterhub/
nano jupyterhub_config.py
Add these info. Replace the id, secret, url and admin user with your values. Adding an admin user is handy because then you can do some basic management of the hub. Read more here.
c.JupyterHub.authenticator_class = "github"
c.OAuthenticator.oauth_callback_url = "https://dhub.bluemountain123.live/hub/oauth_callback"
c.OAuthenticator.client_id = "your oauth2 application id"
c.OAuthenticator.client_secret = "your oauth2 application secret"
c.GitHubOAuthenticator.allowed_organizations = {"MyOrg:JHub"}
c.GitHubOAuthenticator.scope = ["read:org"]
c.GitHubOAuthenticator.admin_users = {"eeholmes"}
Restart the hub
sudo systemctl stop jupyterhub.service
sudo systemctl start jupyterhub.service
Now any member you add to the GitHub organization team should be able to log in.
If you run into trouble, try
sudo systemctl status jupyterhub.serviceSummary
Only the instructions. Make sure you are installing as the root user. I assume you have Python and conda installed.
Create the conda environment
sudo -i

conda create -n jupyterhub python --yes
conda activate jupyterhub
conda install -c conda-forge jupyterhub --yes
conda install -c conda-forge jupyterlab notebook --yes

JHUBENV=/opt/miniconda3/envs/jupyterhub
chmod 755 $JHUBENV
Create user
useradd jhubOpen the 8000 port for access to the application.
#sudo systemctl enable firewalld
#sudo systemctl start firewalld

sudo firewall-cmd  --permanent --add-port 8000/tcp
sudo firewall-cmd --reload
sudo firewall-cmd --list-ports
Create the configuration file. Will be edited at end.
sudo mkdir -p $JHUBENV/etc/jupyterhub/
cd $JHUBENV/etc/jupyterhub/
sudo $JHUBENV/bin/jupyterhub --generate-config
Install docker if needed
sudo yum install -y yum-utils
sudo yum-config-manager --add-repo https://download.docker.com/linux/centos/docker-ce.repo

sudo systemctl start docker
Not sure this is needed.
sudo firewall-cmd --zone=docker --add-port=8081/tcp
sudo firewall-cmd --reload
sudo systemctl restart docker
Install dockerspawner
conda install -c conda-forge dockerspawner --yes
conda install -c conda-forge docker-py --yes
Edit the configuration file.
cd $JHUBENV/etc/jupyterhub/
nano jupyterhub_config.py
Paste this in
# Configuration file for jupyterhub.

c = get_config()  #noqa
c.JupyterHub.port = 8000
c.JupyterHub.hub_bind_url = "http://0.0.0.0:8081"
c.JupyterHub.spawner_class = 'dockerspawner.DockerSpawner'
c.DockerSpawner.remove = True
c.Spawner.http_timeout = 3600
c.DockerSpawner.image_whitelist = {
    'iorocker': 'eeholmes/iorocker-standalone:20231003',
    'rocker-binder': 'eeholmes/rocker-binder:20231003',
    'openscapes-rocker': 'eeholmes/minimal-jhub:20231004',
    'datascience-r': 'jupyter/datascience-notebook:r-4.3.1',
    'scipy-notebook': 'jupyter/scipy-notebook:7e1a19a8427f',
}

notebook_dir = '/home/jovyan'
c.DockerSpawner.notebook_dir = notebook_dir

# Mount the real user's Docker volume on the host to the notebook user's
# notebook directory in the container
c.DockerSpawner.volumes = { 'jupyter-{username}': notebook_dir }
Docker pull of the images. Do all.
docker pull jupyter/datascience-notebook:r-4.3.1
docker pull jupyter/scipy-notebook:7e1a19a8427f
Make a new server service
sudo mkdir -p $JHUBENV/etc/systemd
cd $JHUBENV/etc/systemd
nano jupyterhub.service
Paste this in
[Unit]
Description=JupyterHub
After=syslog.target network.target

[Service]
User=root
Environment="PATH=/bin:/usr/local/sbin:/usr/local/bin:/usr/sbin:/usr/bin:/opt/miniconda3/envs/jupyterhub/bin"
ExecStart=/opt/miniconda3/envs/jupyterhub/bin/jupyterhub -f /opt/miniconda3/envs/jupyterhub/etc/jupyterhub/jupyterhub_config.py

[Install]
WantedBy=multi-user.target
Make sure SELinux doesn’t block our service
ls -Z $JHUBENV/etc/systemd/
sudo chcon system_u:object_r:systemd_unit_file_t:s0 $JHUBENV/etc/systemd/jupyterhub.service
sudo find $JHUBENV/bin -type f -exec chcon system_u:object_r:bin_t:s0 {} \;
Enable our new service
sudo ln -s $JHUBENV/etc/systemd/jupyterhub.service /etc/systemd/system/jupyterhub.service
sudo systemctl daemon-reload
sudo systemctl enable jupyterhub.service
sudo systemctl start jupyterhub.service
Done! See the long instructions if anything is not working.
Now go through the https and GitHub authentication steps if you need that.